Learning how to create a subdomain takes about five minutes once you know where to click — but the instructions look different depending on whether you’re using a hosting control panel, a registrar’s DNS settings, or Cloudflare. This guide walks through every common method, explains the DNS concepts behind each one in plain English, and shows you how to confirm the subdomain is actually working before you build anything on it.
By the end, you’ll know exactly how to add a subdomain, why it sometimes takes time to appear, and which method fits your setup.
Table of Contents
What You’re Actually Creating
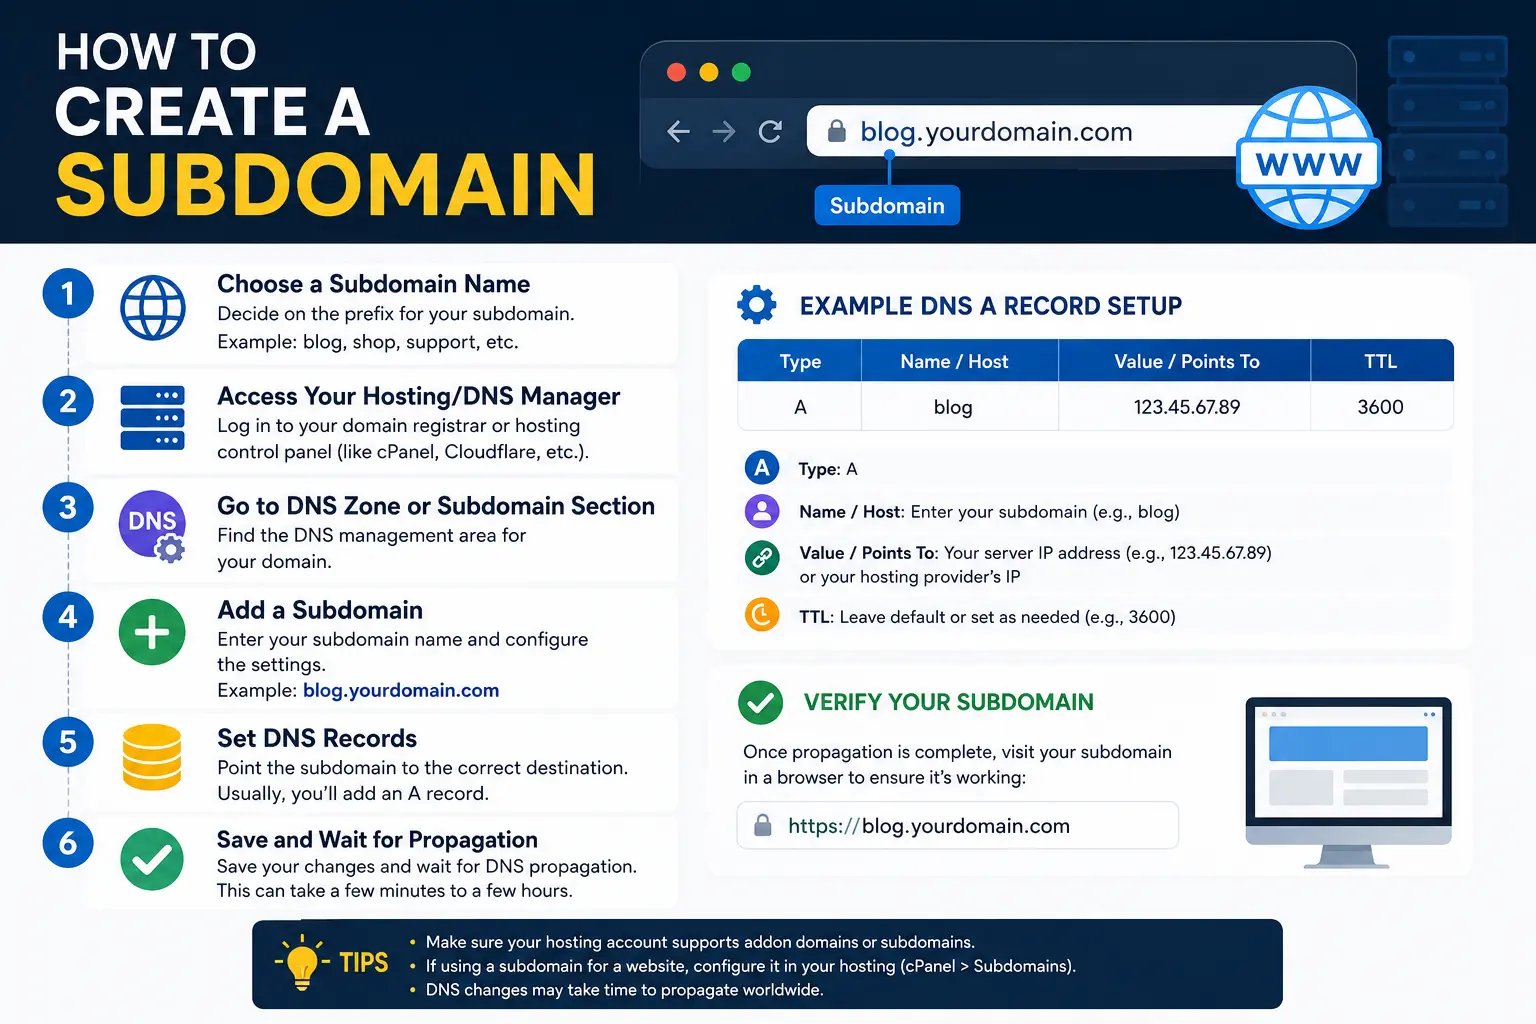
A subdomain is a prefix added to the front of your existing domain name, like blog. or shop. in front of yourdomain.com. It creates an address such as blog.yourdomain.com that can host completely separate content, a different app, or its own design — while still living under the domain you already own.
If you haven’t worked with domains before, it helps to understand the basics first. Our guides on what is a URL and parts of a URL explained cover exactly where a subdomain sits inside a web address, and what is a subdomain goes deeper into how subdomains function structurally. If you’re still deciding whether a subdomain is even the right move for your project, compare it against the alternative in subdomain vs subdirectory and subdomain vs subfolder before you build.
Creating a subdomain doesn’t require buying anything new. If you already own a domain, you already have the ability to create unlimited subdomains under it at no extra cost — it’s simply a matter of adding the right DNS record.
Before You Start: What You’ll Need
- Access to your domain’s DNS settings (through your registrar, your host’s control panel, or a DNS service like Cloudflare)
- The name you want for your subdomain (e.g., blog, shop, app, staging)
- Either the IP address of the server the subdomain should point to, or the hostname it should point to
If you don’t have a domain yet, start with our guide on how to register a domain name and how to choose a domain name. And if you already registered one and aren’t sure what comes next, I have a domain name, now what is a good starting point.
The Two DNS Record Types You’ll Choose Between
Every method below ultimately comes down to adding one of these two DNS record types, managed through your domain name system settings:
| Record Type | What It Does | When to Use It |
| A Record | Points your subdomain directly to a server’s IP address | You know the exact IP address of the server hosting the subdomain |
| CNAME Record | Points your subdomain to another hostname or domain | You’re pointing to a service like a hosting platform, app, or CDN that gives you a hostname instead of an IP |
You’ll typically use one or the other, not both, for the same subdomain.
Method 1: How to Create a Subdomain in cPanel
If your hosting uses cPanel — common with shared hosting providers — this is usually the fastest method, because cPanel creates both the DNS record and a folder for your files automatically.
- Log in to cPanel.
- Find and open the Subdomains section (usually under “Domains”).
- Enter the subdomain prefix you want (e.g., blog).
- Select the parent domain from the dropdown, if you manage more than one.
- Confirm or edit the document root — this is the folder where your subdomain’s files will live.
- Click Create.
cPanel handles the A record creation for you in the background, and the subdomain typically becomes reachable within a few minutes to a few hours, depending on your host’s DNS propagation speed.
Method 2: How to Add a Subdomain Through Your Domain Registrar
If your DNS is managed at your registrar (GoDaddy, Namecheap, and similar providers all work similarly), the process is done through DNS records rather than a “Subdomains” tool.
- Log in to your registrar account and open your domain’s DNS Management or DNS Settings page.
- Click Add Record.
- Choose A (if pointing to an IP address) or CNAME (if pointing to a hostname).
- In the Host or Name field, enter just the subdomain prefix — for example, type shop, not shop.yourdomain.com.
- In the Value, Points To, or IP Address field, enter the destination — either the server IP (for an A record) or the target hostname (for a CNAME).
- Save the record.
This method works whether you’re setting up a subdomain for a new site, a third-party tool, or a service that gave you a specific hostname to point to. If you’re comparing where to manage this long-term, our guides on best domain name registrar and domain name services can help you evaluate your options, and cheap domain name register covers budget-friendly providers if you’re starting from scratch.
Method 3: Setting Up a Subdomain in Cloudflare
If your domain’s nameservers point to Cloudflare, subdomain creation happens entirely at the DNS layer, and Cloudflare gives you extra options like proxying traffic through its network for added security and speed.
- Log in to your Cloudflare account and select your domain.
- Open the DNS tab.
- Click Add Record.
- Select A or CNAME as the record type.
- In the Name field, enter your subdomain prefix (e.g., app).
- In the IPv4 address field (for A records) or Target field (for CNAME records), enter the destination.
- Choose whether the record should be Proxied (routed through Cloudflare, shown by an orange cloud icon) or DNS only (shown by a gray cloud icon).
- Click Save.
Proxied records get Cloudflare’s DDoS protection and performance features automatically. DNS-only records simply resolve the address without routing traffic through Cloudflare’s network — useful for services like email or staging environments that need a direct connection.
Method 4: Creating a Subdomain in WordPress
WordPress itself doesn’t create subdomains — that still happens at the DNS level through your host or registrar, using Method 1 or Method 2 above. Once the subdomain exists and points to your server, you install WordPress in that subdomain’s folder just like you would for any new site. If you’re restructuring an existing WordPress install as part of this process, see how to change domain name on WordPress for the related steps.
How Long Does It Take for a Subdomain to Work?
After you save the DNS record, it needs to propagate — meaning DNS servers around the internet need to update their records with the new information. This usually takes anywhere from a few minutes to a few hours, though it can occasionally take up to 24–48 hours in rare cases.
While you wait, you can check propagation status using a DNS lookup tool, or simply try visiting the subdomain directly in your browser every so often.
How to Confirm Your Subdomain Is Working
- Visit the subdomain directly in your browser (e.g., blog.yourdomain.com).
- If it doesn’t load yet, wait for propagation and try again.
- Check that SSL (HTTPS) is active — most modern hosts and Cloudflare issue free SSL certificates automatically, but it can take a short time after the subdomain is created.
- If you’re using a CMS, confirm the site loads correctly and isn’t showing a default “It works!” or error page.
Common Mistakes When Creating a Subdomain
- Entering the full domain in the Host/Name field. Type only the prefix (blog), not blog.yourdomain.com — most DNS panels add the root domain automatically.
- Choosing the wrong record type. Using an A record when you actually needed a CNAME (or vice versa) is one of the most common setup errors, especially when connecting to third-party platforms.
- Forgetting to wait for propagation before assuming something is broken.
- Not setting up SSL, leaving the subdomain showing as “Not Secure” in browsers.
- Creating a subdomain and forgetting to link to it. An orphaned subdomain with no internal links from your main site is harder for both users and search engines to discover — see URL SEO for how internal linking affects discoverability.
- Skipping Google Search Console verification. Subdomains are treated as separate properties, so if SEO matters for this subdomain, verify it separately, and review our guide on subdomain SEO for how to set it up correctly from the start.
Best Practices for Setting Up a Subdomain
- Use a clear, descriptive prefix (shop, blog, app) rather than something vague.
- Document which record type and destination you used, especially if multiple people manage your DNS.
- Set up SSL before pointing any real traffic to the subdomain.
- If the subdomain is for staging or testing, block it from search engine indexing.
- Plan your internal linking strategy between the subdomain and your main site before launch, not after.
FAQs
How do I create a subdomain for free? If you already own a domain, creating a subdomain costs nothing extra — it’s included with your existing domain registration and DNS management. You’re simply adding a new DNS record, not registering anything new.
How long does it take to set up a subdomain? The setup itself takes a few minutes. DNS propagation afterward typically takes anywhere from a few minutes to a few hours, occasionally up to 48 hours.
Do I need to buy a new domain to get a subdomain? No. A subdomain is part of the domain you already own — you don’t need separate registration.
What’s the difference between an A record and a CNAME for a subdomain? An A record points a subdomain directly to a server’s IP address. A CNAME record points it to another hostname instead, which is common when connecting to hosting platforms or third-party services.
Can I create more than one subdomain? Yes. There’s no practical limit — most hosts and registrars allow you to create as many subdomains as you need under a single domain.
Will my subdomain automatically get an SSL certificate? Most modern hosts and services like Cloudflare issue free SSL certificates automatically for new subdomains, though it can take a short time to activate after DNS propagation completes.
Final Thoughts
Setting up a subdomain is a quick, low-cost way to launch a new section of your site, whether that’s a blog, an app, or a staging environment. The steps are nearly identical everywhere — add a DNS record, point it to the right destination, and wait for propagation. Once it’s live, take the extra few minutes to verify it in Search Console and link to it from your main site, so it’s set up correctly from day one instead of needing cleanup later.