Changing your website’s address is one of those tasks that feels risky — and if you don’t follow the right order of steps, it can be. If you’re wondering how to change domain name on WordPress, the good news is that it’s a well-defined process: update your settings, move your files, fix internal links, set up redirects, and update DNS.
Done correctly, your site stays online, your SEO rankings transfer over, and visitors land exactly where they should. Done out of order, you can end up locked out of your own dashboard or watch your search rankings drop. This guide walks through the entire process safely, in the correct order, whether you’re switching to a brand-new domain or just changing part of your existing one.
Table of Contents
Before You Start: What “Changing a Domain” Actually Involves
A WordPress site stores its domain name in two places inside the database: the Site Address (URL) and WordPress Address (URL) settings. Changing the domain isn’t just about buying a new name — it means updating these settings, redirecting the old domain, and making sure every internal link and image path points to the new address.
There are two common scenarios:
- Full domain change — moving from oldsite.com to newsite.com entirely.
- Partial change — switching subdomains, protocols (http to https), or www vs. non-www versions.
Both follow a similar process, just with different scope. If you haven’t registered your new domain yet, our guide on how to register a domain name covers that first step, and how to choose a domain name can help if you’re still deciding on the new address.
Before You Begin: Pre-Change Checklist
Skipping preparation is the most common reason domain changes go wrong. Do these first:
- Back up your entire site — files and database, using a plugin like UpdraftPlus or your host’s backup tool.
- Confirm the new domain is registered and DNS is accessible.
- Note your current WordPress Address and Site Address under Settings → General.
- Export a list of your top pages/posts so you can verify indexing later.
- Choose a maintenance window — ideally low-traffic hours, since search engines and visitors may briefly see downtime.
How to Change Domain Name on WordPress: Step-by-Step
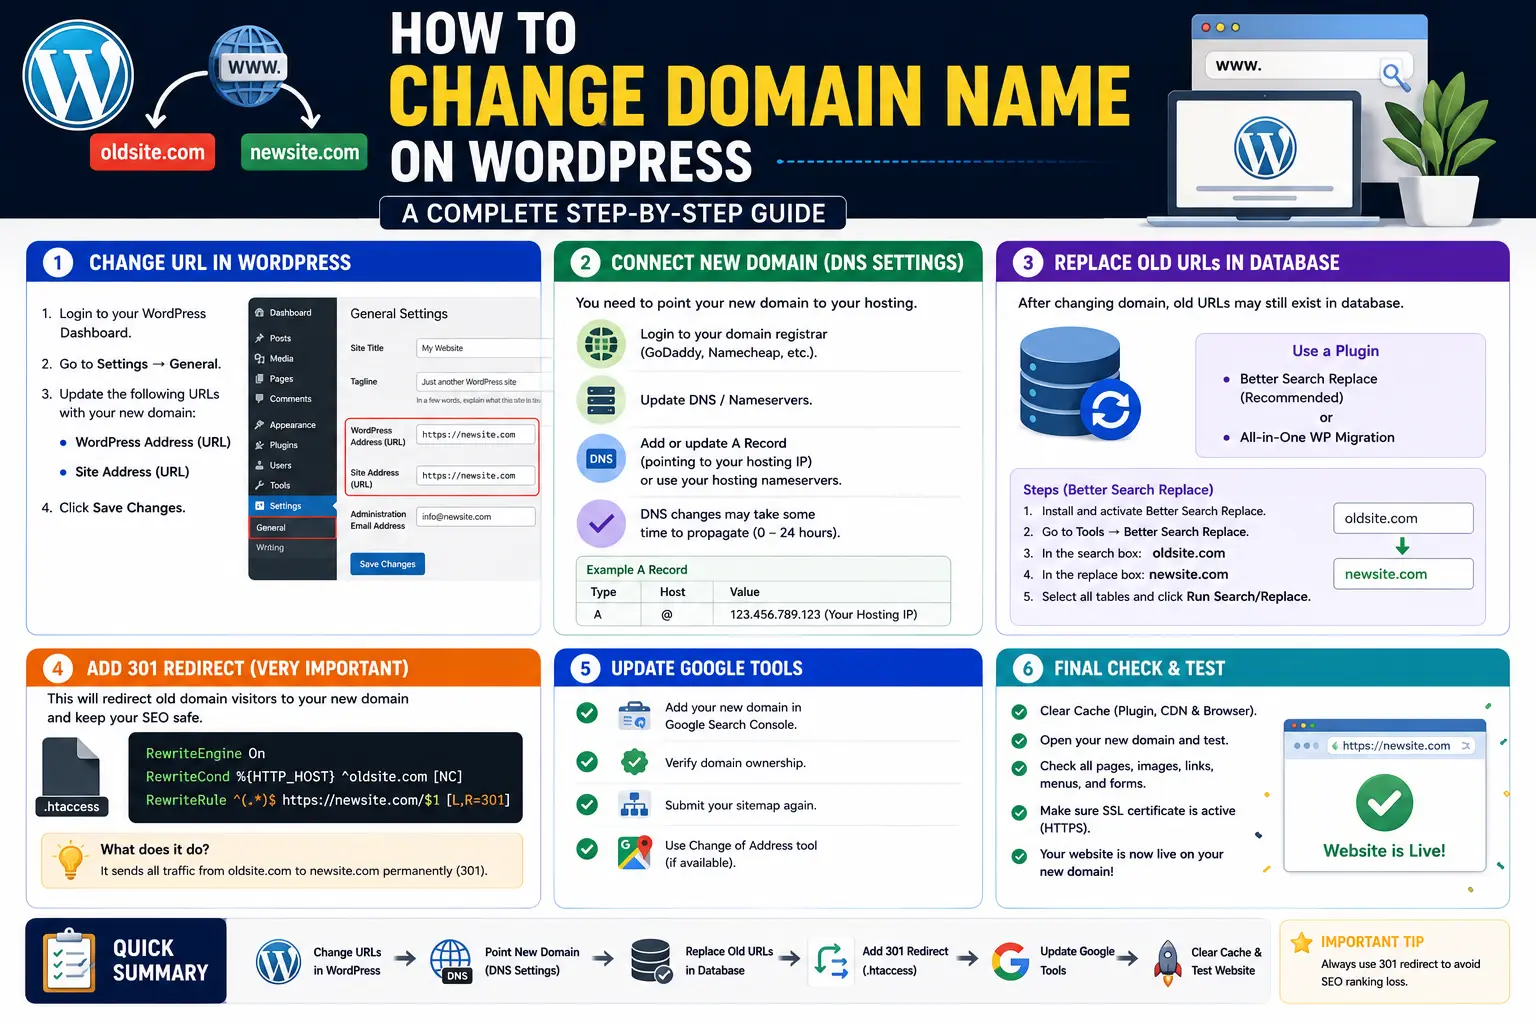
Step 1: Update the Site Address in WordPress Settings
The fastest method for most sites:
- Log into your WordPress dashboard.
- Go to Settings → General.
- Update both the WordPress Address (URL) and Site Address (URL) fields to your new domain.
- Save changes.
Warning: Saving this before your new domain’s DNS is pointing to your hosting will lock you out of the dashboard, since WordPress will try to load the new URL immediately. Only do this step once DNS and hosting are ready (Step 4 below), or use the wp-config.php method instead.
Step 2: Update the Site Address via wp-config.php (Safer Method)
This avoids lockouts because it overrides the database setting without needing dashboard access.
- Connect to your site via FTP or your hosting file manager.
- Open wp-config.php.
- Add these two lines above the line that says /* That’s all, stop editing! */:
define(‘WP_HOME’,’https://newdomain.com’);
define(‘WP_SITEURL’,’https://newdomain.com’);
- Save the file. Your site will now load using the new domain immediately, even before the database fields are updated.
This method is preferred by developers and hosting support teams because it’s reversible in seconds — just remove the two lines if something goes wrong.
Step 3: Update the Database with Search and Replace
Your domain name is likely stored in hundreds of places inside your database — post content, image URLs, widget settings, and serialized data. Manually editing these is risky because WordPress uses serialized data, where a simple find-and-replace can corrupt the structure if lengths don’t match.
The safe approach:
- Install a plugin like Better Search Replace or WP Migrate.
- Go to the plugin’s search-and-replace tool.
- Search for oldsite.com and replace with newdomain.com.
- Run it across all relevant tables (posts, postmeta, options).
- Always take a fresh backup immediately before running this step.
This single step is what most beginner tutorials skip or oversimplify, and it’s the reason many domain changes leave broken image links behind.
Step 4: Point DNS to Your Hosting
Your domain registrar controls where your domain “points” on the internet. To connect your new domain to your existing WordPress hosting:
- Log into your domain registrar (where you bought the domain).
- Locate DNS management or nameserver settings.
- Update the A record to your hosting provider’s IP address, or update nameservers if your host manages DNS.
- Allow time for DNS propagation — this typically takes anywhere from a few minutes to 48 hours.
If you’re unfamiliar with what DNS actually does behind the scenes, our explainer on what is a domain name system breaks down how this translation from domain to server address works.
Step 5: Set Up 301 Redirects From the Old Domain
This step protects your SEO rankings and existing visitors. A 301 redirect tells browsers and search engines “this content has permanently moved,” passing along most of the old page’s search authority to the new one.
- If your old domain is still hosted, add redirect rules via a plugin like Redirection, or directly in .htaccess:
RewriteEngine On
RewriteRule ^(.*)$ https://newdomain.com/$1 [R=301,L]
- This redirects every URL path exactly, so oldsite.com/about forwards to newdomain.com/about automatically.
Skipping this step is the single biggest cause of lost search traffic after a domain migration.
Step 6: Update Internal Links and Fixed References
Even after the database search-and-replace, check manually for:
- Hardcoded links in custom theme files or widgets
- Menu items pointing to the old domain
- Contact forms or plugin settings storing the old URL
- Any hardcoded canonical tags in SEO plugin settings
Step 7: Update Google Search Console and Analytics
- Add and verify the new domain as a fresh property in Google Search Console.
- Use the Change of Address tool inside Search Console (found under old domain settings) to tell Google the site has moved.
- Update tracking codes in Google Analytics or any other analytics tool to reflect the new domain.
- Submit an updated XML sitemap for the new domain.
Step 8: Test Everything Before Announcing the Change
- Visit the new domain in an incognito browser window to confirm it loads correctly.
- Click through main menu items, checkout flows, and forms.
- Check that images and CSS/JS files load without broken paths.
- Confirm the old domain redirects properly to the matching new page, not just the homepage.
Common Domain Change Scenarios Compared
| Scenario | Complexity | Key Extra Step |
| Full domain change (old.com → new.com) | High | Full redirect map + Search Console change of address |
| Subdomain to root domain (blog.old.com → old.com) | Medium | Database search-replace + redirect rules |
| HTTP to HTTPS | Low | SSL certificate install + force-HTTPS redirect |
| www to non-www (or reverse) | Low | Single redirect rule + canonical URL update |
Common Mistakes When Changing a WordPress Domain
- Updating Settings → General before DNS points to hosting, causing a dashboard lockout.
- Skipping the database search-and-replace, leaving broken images and internal links scattered across old posts.
- Forgetting 301 redirects, which causes both visitors and Google to hit dead pages on the old domain.
- Not backing up before running search-and-replace, which turns a small mistake into a full site restore.
- Leaving the old domain unregistered after migration, which lets someone else claim it and potentially redirect your old traffic elsewhere.
- Forgetting SSL on the new domain, causing browser security warnings immediately after launch.
Will Changing My Domain Hurt My SEO?
A properly executed migration with 301 redirects, an updated sitemap, and a Search Console change-of-address submission typically preserves the majority of your search rankings within a few weeks. Search engines transfer authority through redirects, but expect a short adjustment period — usually days to a few weeks — while Google recrawls and reindexes the new domain.
Skipping redirects or leaving broken links behind is what actually causes ranking loss, not the domain change itself.
Best Practices for a Smooth Domain Migration
- Always migrate during low-traffic hours to minimize disruption.
- Use the wp-config.php method over Settings → General to avoid lockouts.
- Keep the old domain registered and redirecting for at least 6–12 months.
- Test every major page type — homepage, blog post, product page, contact form — after migration.
- Monitor Search Console for crawl errors during the first few weeks after the switch.
- If you’re also moving hosts at the same time, complete the domain change and host migration as separate, sequential steps rather than simultaneously, to isolate any issues that come up.
Frequently Asked Questions
How long does it take to change a domain name on WordPress? The technical steps typically take 30–60 minutes for a straightforward site. However, full DNS propagation can take up to 48 hours, and search engines may take a few weeks to fully re-index the new domain.
Will I lose my WordPress content when I change domains? No. Your posts, pages, and media stay intact as long as you follow the database update process correctly. Only the domain name itself changes, not the underlying content.
Do I need to buy a new hosting plan to change domains? No. You can keep your existing hosting and simply point your new domain to the same server, as long as your host supports adding or changing domains on your plan.
What happens to my old domain after I switch? If you set up 301 redirects and keep the old domain registered, visitors and search engines following old links will automatically land on the correct new page.
Can I change my domain name without losing Google rankings? Yes, in most cases, as long as you implement 301 redirects, update Search Console with the change of address, and avoid leaving broken links behind. Some temporary ranking fluctuation during reindexing is normal.
Do I need a plugin to change my WordPress domain? Not strictly, but a search-and-replace plugin like Better Search Replace makes the database update significantly safer and faster than editing serialized data manually.
Final Thoughts
Changing a domain name on WordPress isn’t complicated once you follow the right sequence: update the site address safely, run a proper database search-and-replace, redirect the old domain, and inform search engines of the move. Rushing the order — especially skipping redirects or database updates — is what turns a routine migration into a broken site. Follow each step above in order, test thoroughly, and your new domain will be live without losing the traffic or rankings you’ve already built.