Figuring out how to build a website to sell a product used to require hiring a developer and a designer. Today, you can launch a fully functional online store yourself — no coding required — as long as you follow the right steps in the right order.
This guide walks through the entire process: choosing a platform, setting up your product pages, handling payments and shipping, and avoiding the mistakes that quietly hurt sales on otherwise good-looking stores.
Whether you’re selling handmade goods, digital downloads, or a single flagship product, the core process is the same. Let’s build it step by step.
Table of Contents
What You Need Before You Start
Before touching any website builder, gather these essentials — they’ll make every following step faster:
- Your product details — names, descriptions, prices, and at least a few clear photos for each item.
- A business structure decision — even a simple sole proprietorship setup, since this affects how you register payment processing.
- A domain name idea — your website’s address (like yourbrand.com). Check availability early since good names get taken quickly.
- A way to accept payments — most platforms handle this for you, but you’ll need a bank account to receive the money.
- A shipping or delivery plan — even if it’s just “I’ll ship via a local carrier,” decide this before launch, not after your first order.
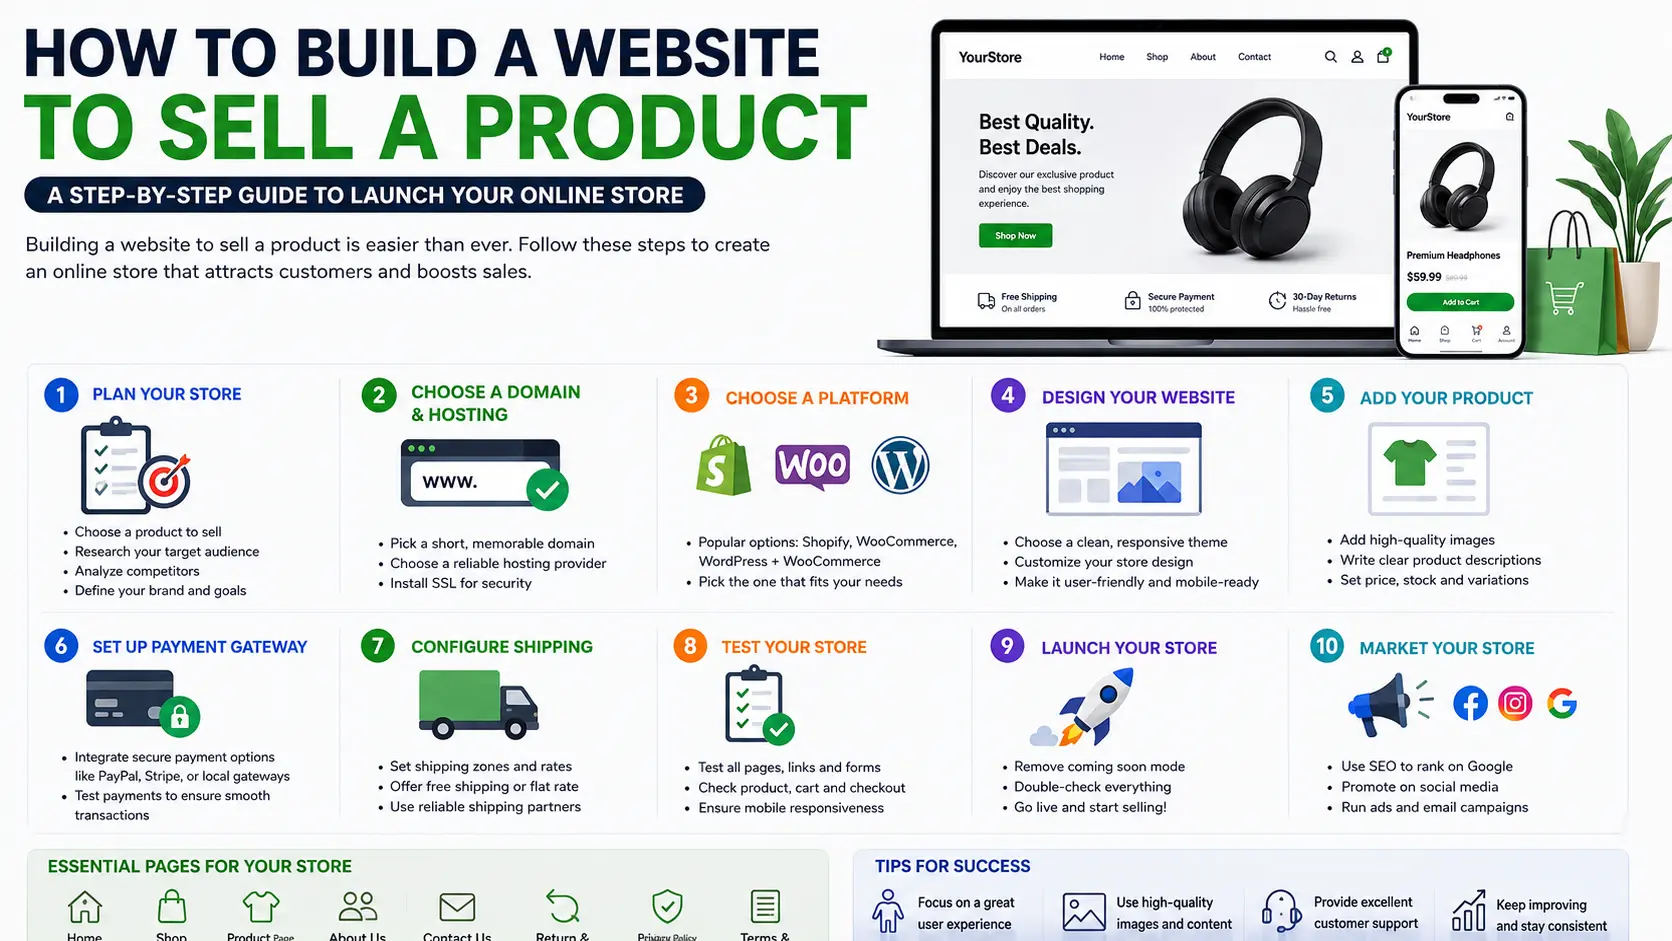
Step 1: Choose the Right Platform to Build Your Store
This is the most important decision in the entire process, because it determines how much technical work you’ll do and how much you’ll pay ongoing.
| Platform Type | Examples | Coding Needed | Best For |
| Hosted e-commerce builder | Shopify, Squarespace Commerce, Square Online | None | Beginners wanting an all-in-one, fast setup |
| WordPress + e-commerce plugin | WordPress with WooCommerce | Low | Sellers who want more control and already know WordPress |
| Marketplace-integrated store | Etsy, Amazon (with an optional linked website) | None | Sellers wanting built-in traffic alongside a website |
| Custom-built site | Hand-coded or developer-built | High | Businesses with unique technical needs |
For most first-time sellers, a hosted e-commerce builder is the right starting point. These platforms combine website hosting, product management, payment processing, and basic shipping tools into one dashboard, so you’re not stitching together separate services.
Hosted builder vs. WordPress: how to decide
Choose a hosted builder if you want to launch quickly and don’t want to manage technical maintenance yourself.
Choose WordPress with an e-commerce plugin if you want deeper customization, plan to combine a blog or content strategy with your store, or already have WordPress experience.
Step 2: Register Your Domain Name
Your domain is your website’s address on the internet — what customers type into their browser or see linked from your social media.
- Keep it short, easy to spell, and closely related to your brand name.
- Choose a .com extension when possible, since it’s the most recognized and trusted by customers.
- Avoid numbers, hyphens, or hard-to-pronounce spellings, which make word-of-mouth referrals harder.
Most e-commerce builders let you register a domain directly during setup, or you can buy one separately through a domain registrar and connect it afterward.
Step 3: Set Up Your Store’s Structure
Before adding products, plan the basic pages your store needs. A clear structure helps both customers and search engines understand your site.
- Home page — introduces your brand and highlights featured products.
- Shop/Product listing page — where all products are browsable, ideally organized into categories.
- Individual product pages — one detailed page per product (covered in Step 4).
- Cart and checkout — usually built into your platform automatically.
- About page — builds trust by explaining who’s behind the store.
- Shipping/Returns policy page — answers common pre-purchase questions and reduces support requests.
- Contact page — gives customers a way to reach you with questions.
Step 4: Build Product Pages That Actually Sell
A product page has one job: answer every question a customer might have before they decide to buy, without them needing to contact you first.
What every product page needs
- Clear, well-lit photos from multiple angles. Products with only one low-quality image convert noticeably worse than those with 3–5 clear photos.
- A specific, benefit-focused description — not just specs, but what the product actually does for the buyer.
- Price, including any variants (size, color, quantity) clearly selectable.
- Shipping information or delivery estimate, ideally visible without leaving the page.
- A visible “Add to Cart” or “Buy Now” button — this sounds obvious, but poor page design sometimes buries it below other content.
Example — weak product description: “Ceramic mug. 12oz. Dishwasher safe.”
Example — strong product description: “Start your morning right with this 12oz hand-glazed ceramic mug — sized perfectly for a full pour of coffee or tea. Dishwasher and microwave safe, so it fits into your actual routine, not just your shelf.”
The second version paints a picture of use, which helps a browsing visitor imagine owning the product — a key psychological step before purchase.
Step 5: Set Up Payments
To accept money from customers, you need a payment processor connected to your store — the service that securely handles card transactions and deposits funds into your bank account.
Most hosted builders include a built-in payment processor you can activate directly from your dashboard, while WordPress-based stores typically require connecting a separate service like Stripe or PayPal.
When setting this up:
- Enter accurate business information, since processors verify this before approving full account access.
- Enable multiple payment methods (major cards, digital wallets like Apple Pay or Google Pay) to reduce checkout friction.
- Review the transaction fee structure — most processors charge a small percentage plus a fixed fee per transaction.
Step 6: Set Up Shipping and Fulfillment
Decide how products physically get from you to the customer before your first sale goes live, not after.
| Fulfillment Method | How It Works | Best For |
| Self-fulfillment | You pack and ship each order yourself | New or small-volume sellers |
| Dropshipping | A supplier ships directly to the customer on your behalf | Sellers who don’t hold inventory |
| Third-party fulfillment | A fulfillment company stores and ships your inventory for you | Growing stores with higher order volume |
| Local delivery/pickup | You deliver or customers collect in person | Local businesses, perishable goods |
For most new stores, self-fulfillment is the simplest starting point. Set clear processing times (like “orders ship within 2 business days”) and communicate them on your shipping policy page so customers know what to expect.
Step 7: Test Everything Before Launch
This step gets skipped more often than it should. Before announcing your store, personally walk through the entire buying process as if you were a customer:
- Browse from the homepage to a product page.
- Add an item to the cart and adjust the quantity.
- Go through checkout using a real (or test) payment method.
- Confirm you receive an order confirmation email.
- Check how the store looks and functions on a mobile phone — most shoppers will visit on mobile first.
If any step feels confusing or broken to you, it will feel the same to a paying customer.
Common Mistakes When Creating a Website to Sell Things
- Launching with too few product photos. Customers can’t touch or try the product, so images carry most of the trust-building work.
- Vague or copied product descriptions. Generic manufacturer descriptions rarely explain the specific benefit to your customer.
- Hiding shipping costs until checkout. Unexpected fees at the final step are one of the leading causes of abandoned carts.
- No clear return or refund policy. Uncertainty about returns makes hesitant buyers walk away before purchasing.
- Overcomplicating the checkout process. Every extra required field or unnecessary account creation step reduces completed purchases.
- Skipping mobile testing. A store that looks great on a laptop but breaks on a phone loses the majority of potential buyers.
Best Practices for a Website That Sells Products
- Start with a focused product range. A tightly curated store often converts better than one with dozens of unrelated items.
- Use customer reviews once available. Social proof meaningfully increases buyer confidence, especially for first-time visitors.
- Optimize page load speed. Slow product pages cause visitors to leave before they even see what you’re selling.
- Write product titles the way customers actually search, not just internal naming conventions, to help both search engines and on-site search find them.
- Set up abandoned cart emails if your platform supports them — many visitors who don’t complete checkout the first time will return if reminded.
- Track your store’s analytics from day one so you know which products, pages, and traffic sources are actually driving sales.
Frequently Asked Questions
What is the easiest way to make a website to sell things?
A hosted e-commerce builder like Shopify or Square Online is the easiest option for beginners. These platforms combine hosting, product listings, and payment processing into a single guided setup, with no coding required.
How much does it cost to build a website to sell products?
Costs vary by platform, but most hosted builders range from about $20–$70 per month, plus a small percentage per transaction. Domain registration typically adds $10–$20 per year on top of that.
Do I need a business license to sell products online?
Requirements vary by location and business size. Many small sellers start as a sole proprietorship, which often doesn’t require a separate license, but it’s worth checking your local and state requirements before selling at scale.
Can I sell products on my website without holding inventory?
Yes. This is called dropshipping — a supplier ships products directly to your customers, so you never physically handle inventory. It reduces upfront costs but typically comes with lower profit margins than self-fulfillment.
How long does it take to build a website to sell a product?
A simple store with a hosted builder can be set up in a few days, including product uploads and testing. More customized or WordPress-based stores can take one to a few weeks depending on complexity.
Do I need a separate website if I already sell on a marketplace like Etsy or Amazon?
Not necessarily, but a dedicated website gives you full control over branding, customer data, and profit margins, since marketplaces charge listing or referral fees and limit design customization.
Final Thoughts How to Build a Website to Sell a Product
Building a website to sell a product comes down to a clear sequence: pick the right platform for your skill level, structure your store logically, create product pages that answer buyer questions upfront, and set up payments and shipping before you ever expect your first order.
Start focused — a handful of well-presented products on a tested, working store will outperform a large, rushed catalog every time. Once real orders start coming in, use what you learn from actual customers to refine the details.