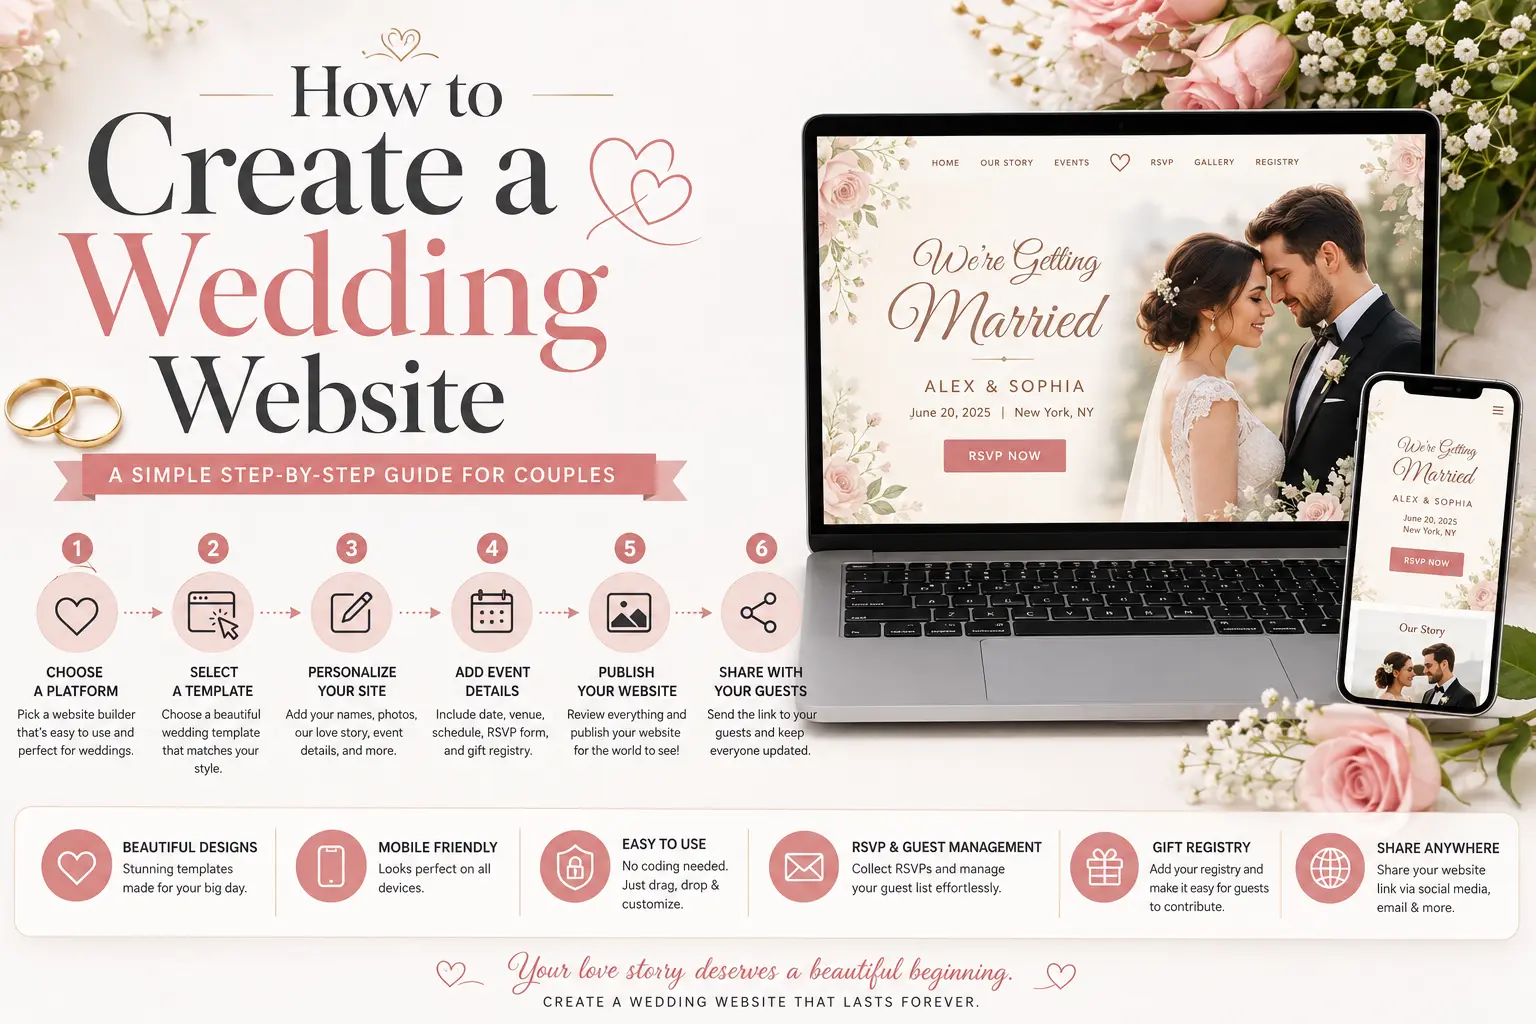
If you’re not sure where to start, learning how to create a wedding website is actually one of the simplest parts of wedding planning — most couples have one built in under an hour. It becomes the single link you share with guests for everything: the date, the venue, the dress code, your registry, and RSVPs.
This guide walks through exactly how to build one, compares the best free and paid wedding website builders available right now, and covers what to include so guests never need to text you asking the same questions twice.
Table of Contents
Why You Need a Wedding Website
Without a wedding website, every detail about your big day travels through texts, phone calls, and word of mouth — and something always gets lost. A wedding website solves this by giving you one shareable link that answers the questions guests ask most:
- What’s the date and location?
- Is there a hotel block, and what’s the code?
- What’s the dress code?
- Can I bring a plus-one or kids?
- Where’s the registry?
- How do I RSVP?
Once it’s live, you send the link in your invitations or save-the-dates, and guests handle the rest themselves.
The Best Wedding Website Builders Compared
Before you start building, it helps to know which platform actually fits your needs. Here’s how the top options compare.
| Builder | Best For | Price | Templates | Registry | RSVP Tools |
| Zola | All-in-one planning | Free | 300+ | Built-in, fee-free cash funds | Strong |
| The Knot | Maximum template variety | Free | 100+ | Universal registry links | Strong |
| Joy | Most design variety | Free | 600+ | Links out to other platforms | Good |
| With Joy | Best free RSVP tools | Free (premium $39.99) | Wide selection | Links out | Most advanced free option |
| Minted | Matching paper stationery | Free | 1,000+ | Links out | Good |
| Squarespace | Full design control | From $16/mo | ~10 premium | None built-in | None built-in |
| Wix | Most customization | Free–paid tiers | Wide selection | Third-party | Basic, expandable |
The short version: if you want the most complete free package (design, registry, and RSVP in one place), Zola or The Knot are the safest choices. If design variety matters most and you don’t mind linking out to a separate registry, Joy or Minted stand out. If you want full creative control and don’t need built-in wedding tools, Squarespace or Wix give you the most design freedom — for a monthly fee.
How to Create a Wedding Website: Step-by-Step
Step 1: Choose Your Platform
Pick a builder based on what matters most to you — design variety, an integrated registry, or advanced RSVP tracking (see the comparison table above). Most couples don’t need to pay anything: the major free platforms cover the essentials for most weddings.
Step 2: Pick a Template That Matches Your Wedding Style
Every builder organizes templates by style — modern, classic, rustic, minimalist, and so on. Choose one that reflects your wedding’s overall look, since guests will often see this design before anything else, including your invitations.
Step 3: Add Your Core Details
At minimum, include:
- Wedding date and time
- Ceremony and reception venue, with addresses
- Schedule of events, if you have multiple (welcome dinner, ceremony, reception, brunch)
- Dress code
Step 4: Set Up RSVP Collection
Turn on your platform’s built-in RSVP form so guests can respond directly through the website instead of calling or texting. Most free builders let you track responses, meal choices, and plus-ones in a dashboard, and export the guest list as a spreadsheet when you need final headcounts for your caterer or venue.
Step 5: Add Your Registry
Link your registry — either built into the platform (like Zola’s fee-free cash funds) or linked out to an external registry you’ve already set up elsewhere. If you’re registered at multiple stores, most builders let you combine them under a single link so guests don’t need to visit several sites.
Step 6: Include Travel and Accommodation Info
Add a section covering:
- Nearby hotels and any block/discount code
- Parking information
- Local transportation or rideshare notes
- Airport information, if a meaningful number of guests are traveling
Step 7: Write Your “Our Story” Section
Most templates include a spot for a short story about how you met and got engaged. Keep it a few short paragraphs — guests enjoy it, but it doesn’t need to be a full autobiography.
Step 8: Set a Password (Optional but Recommended)
If you’d rather keep wedding details private from search engines or anyone outside your guest list, turn on password protection, available on nearly every major builder. Share the password along with the website link on your invitations.
Step 9: Preview on Mobile Before Sharing
Most guests will open your wedding website link from their phone, often straight from a text message. Check that the layout, RSVP form, and registry links all work cleanly on a small screen before you send it out.
Step 10: Share the Link
Once everything looks right, share your wedding website link through save-the-dates, invitations, and a wedding hashtag or social post if you’re using one. Update it as details change — most platforms let guests see updates automatically since it’s a live site, not a printed card.
Free vs. Paid Wedding Website Builders
| Free Builders (Zola, The Knot, Joy) | Paid Builders (Squarespace, Wix) | |
| Cost | $0 | Roughly $12–$39/month |
| Built-in RSVP & registry | Yes | Usually requires third-party tools |
| Design control | Template-based, limited customization | Full design flexibility |
| Custom domain | Sometimes free, sometimes a paid add-on | Often included after the first year |
| Best for | Most couples who want an easy setup | Couples who want a fully custom look and don’t need built-in wedding tools |
For the vast majority of weddings, a free builder covers everything you need. Paid builders make more sense if you specifically want a highly custom design and are comfortable connecting outside tools for RSVP and registry functionality.
What to Include on Your Wedding Website: Complete Checklist
- Wedding date, time, and countdown (optional)
- Ceremony and reception locations with addresses
- Full event schedule, if there’s more than one event
- Dress code
- RSVP form with a clear deadline
- Registry link(s)
- Hotel and travel information
- Your story
- Wedding party introductions (optional)
- FAQ section for common guest questions
- Photo gallery (engagement photos, or updated later with wedding photos)
- Contact info for a point person, in case guests have last-minute questions
Common Mistakes to Avoid
- Forgetting to set an RSVP deadline. Without one, responses trickle in too late for accurate headcounts.
- Burying the venue address. Make it easy to find — ideally within the first section guests see.
- Not testing the mobile view. A site that looks perfect on a laptop can break or look cramped on a phone.
- Skipping password protection when privacy matters. If you don’t want the site publicly searchable, turn on password protection before sharing the link.
- Leaving the site unfinished before sharing it. Guests will visit the link as soon as they get it — make sure the essentials are filled in before you send invitations.
- Forgetting to update it after the wedding. Many couples leave a heartfelt thank-you note or a few favorite photos up afterward, which guests appreciate.
Best Practices
- Keep the design simple and legible. A beautiful template with hard-to-read text still frustrates guests.
- Put the most-needed information first, especially the date, location, and RSVP link — don’t make guests scroll through your love story to find the ceremony time.
- Use one clear call-to-action for RSVPs, rather than scattering the process across multiple pages.
- Double-check every address and link before sharing, especially hotel booking links and registry URLs.
- Share the link early, ideally with your save-the-dates, so guests can start planning travel.
Frequently Asked Questions
Is it free to create a wedding website? Yes. Platforms like Zola, The Knot, and Joy offer fully free wedding websites, including RSVP collection and registry links, with no cost to publish.
What is the best free wedding website builder? Zola and The Knot are generally considered the strongest free all-in-one options, combining design templates, RSVP tracking, and integrated registries in one place. Joy offers the widest template selection if design variety matters most to you.
When should I create my wedding website? Most couples build their wedding website shortly after getting engaged, then share the link with save-the-dates (typically 6–12 months before the wedding) so guests have time to plan travel.
Do I need a wedding website if I already sent paper invitations? Yes — a wedding website complements paper invitations rather than replacing them. It’s the place guests go for details that don’t fit on a printed card, like travel logistics, updates, and online RSVP.
Can I password-protect my wedding website? Yes, most major builders let you add a password so only guests with the link and password can view your details, keeping the page out of public search results.
How do I make sure guests actually RSVP through the website? Set a clear RSVP deadline, place the RSVP button prominently near the top of the site, and mention the website link directly on your paper invitations so there’s one obvious place to respond.
Final Thoughts
Learning how to create a wedding website really comes down to picking a builder that matches what you need — free, all-in-one platforms like Zola and The Knot cover most weddings perfectly well, while paid tools like Squarespace make sense if a fully custom design matters more to you than built-in RSVP and registry tools. Whichever you choose, focus on getting the essentials (date, location, RSVP, registry) live and accurate first, then add the personal touches once the practical details are covered.