Learning how to hyperlink in PowerPoint turns a static slide deck into something visitors can actually click through — jumping to a specific slide, opening a website, starting an email, or navigating to another file entirely, all with a single click during a presentation.
This guide covers every type of hyperlink PowerPoint supports, how to apply one to text, shapes, or images, how to style the link so it doesn’t clash with your design, and a few techniques — like action buttons — that most basic tutorials skip.
Table of Contents
What Can You Hyperlink to in PowerPoint?
Before diving into steps, it helps to know the full range of what a PowerPoint hyperlink can actually point to:
- A website or webpage (an external URL)
- A specific slide within the same presentation (useful for navigation menus or “back to agenda” links)
- A different PowerPoint file entirely
- A new, not-yet-created document
- An email address (opens the viewer’s default email program with that address pre-filled)
Any of these can be attached to text, a shape, an image, or even part of a chart — giving you real flexibility in how the link appears on the slide.
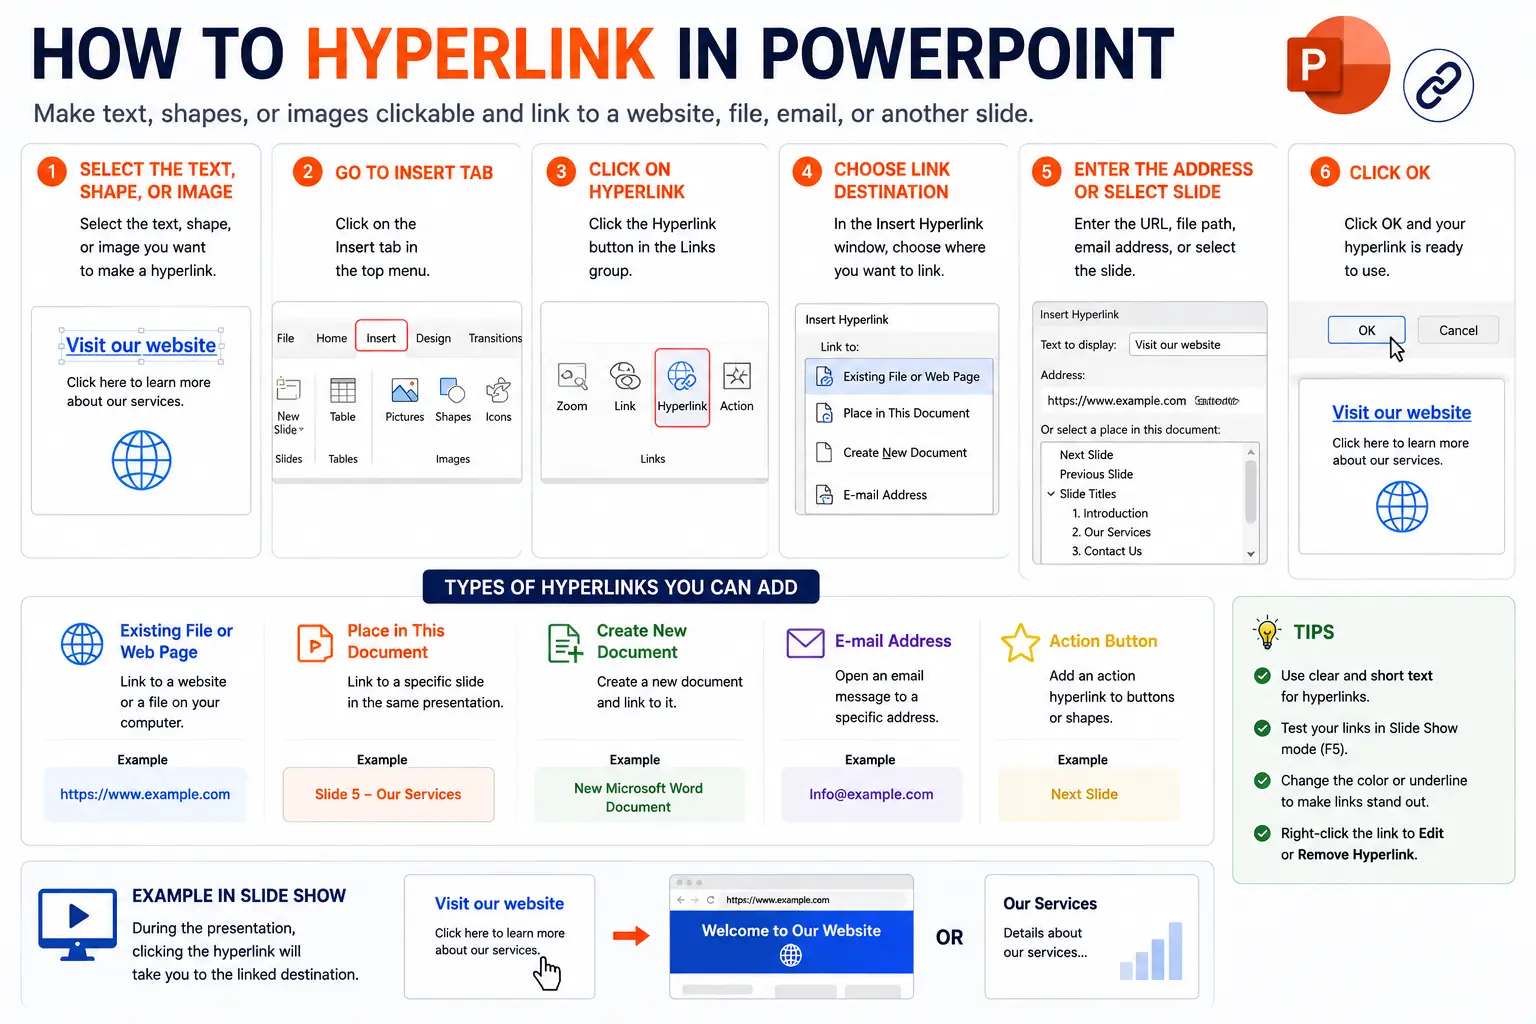
How to Hyperlink in PowerPoint: Basic Steps
Step 1: Select what you want to turn into a link
Click and select the text, shape, or image you want to make clickable. This becomes the visible element viewers will click during the presentation.
Step 2: Open the Insert Link menu
Go to Insert > Link > Insert Link in the ribbon.
Step 3: Choose your link destination
A dialog box opens with several options on the left side:
- Existing File or Web Page — for linking to a website URL or a file saved on your computer.
- Place in This Document — for linking to a specific slide within the same presentation.
- Create New Document — for linking out to a brand-new file that doesn’t exist yet.
- E-mail Address — for linking to an email address, which opens a pre-filled draft when clicked.
Step 4: Fill in the details
Depending on which option you chose:
- For a website link: paste the full URL into the Address field.
- For a slide link: select the specific slide from the list shown.
- For an email link: enter the email address and, optionally, a subject line that pre-fills automatically.
You can also edit the Text to display field and add an optional ScreenTip — a small tooltip that appears when someone hovers over the link during editing.
Step 5: Click OK
The link is now active. In Normal view (the standard editing mode), you can test it by right-clicking the hyperlink and selecting Open Hyperlink.
Quick Shortcut: Auto-Linking a Typed URL
If you simply type a full web address directly onto a slide (like www.example.com) and press Enter or the spacebar afterward, PowerPoint automatically converts it into a clickable hyperlink without needing to open the Insert Link menu at all. This is the fastest method when you just need a plain, visible URL to be clickable.
How to Hyperlink a Shape or Image in PowerPoint
The same process applies to shapes and images, not just text — this is especially useful for building interactive menus or clickable icons.
- Click once on the shape or image to select it (not double-click, which would try to edit text inside it).
- Go to Insert > Link > Insert Link, exactly as with text.
- Choose the destination the same way described above.
- Click OK.
A hyperlinked shape or image doesn’t visually change by default (no underline or color shift, unlike text), so during editing you may want to add a subtle visual cue — like a border or icon — so viewers can tell it’s clickable during the actual presentation.
Using Action Buttons for Navigation
For presentations meant to be more interactive — like a self-guided kiosk display or a menu-style navigation system — action buttons offer a more purpose-built alternative to manually hyperlinking individual shapes.
- Go to Insert > Shapes, and scroll to the Action Buttons section at the bottom of the shapes gallery.
- Choose a pre-designed button style (Home, Back, Forward, Beginning, End, and others are included).
- Draw the button onto your slide.
- The Action Settings dialog opens automatically — choose the destination (like “Next Slide,” “First Slide,” or a specific slide) under the Hyperlink to dropdown.
- Click OK.
Action buttons come with recognizable built-in icons (arrows, a house symbol, and similar), which make navigation intent immediately clear to viewers without needing extra design work.
How to Change the Color of a Hyperlink
By default, hyperlinked text often appears in a color that may not match your slide’s design. To adjust it:
- Select the hyperlinked text.
- On the Home tab, click the small arrow next to the Font Color button.
- Choose the color you want.
This changes only the selected link’s color without affecting its clickability. If you want to change hyperlink colors consistently across an entire presentation, this is typically controlled through your presentation’s theme colors, rather than adjusting each link individually.
How to Hyperlink in PowerPoint on Mobile or Web
The core process is similar across platforms, though the menu layout shifts slightly.
| Platform | Menu Path |
| Windows/Mac desktop | Insert > Link > Insert Link |
| PowerPoint for the web | Insert > Link |
| PowerPoint for iPad/iPhone | Insert tab > Link |
| PowerPoint for Android | Insert tab > Link |
Across all versions, the underlying options — linking to a webpage, a slide, a new file, or an email address — remain consistent, even if the exact menu icons or layout differ slightly by platform.
Real-World Use Cases
- Interactive training decks: Linking a main menu slide to specific topic slides, letting viewers jump directly to the section they need rather than clicking through sequentially.
- Sales presentations: Linking to a live product page, pricing sheet, or case study hosted online, so the presenter can pull up supporting detail without leaving PowerPoint.
- Self-guided kiosk presentations: Using action buttons to let a viewer navigate a presentation entirely on their own, without a live presenter advancing the slides.
- Table of contents slides: Linking each listed topic directly to its corresponding slide, functioning like a clickable index.
- Contact slides: Linking a presenter’s name or email address directly to a pre-filled email draft for easy follow-up.
Common Mistakes When Adding Hyperlinks in PowerPoint
- Forgetting hyperlinks don’t work in Slide Show view from a printed handout or exported image. Links only function within PowerPoint itself (or when exported to certain interactive formats like PDF with tags preserved) — not in a static screenshot or printed copy.
- Linking to a local file on your computer, then moving the presentation elsewhere. If a hyperlink points to a file saved on your device rather than a website, that link breaks once the presentation is opened on a different computer — bring the linked file along, or use a cloud-hosted link instead.
- Not testing links before presenting. A typo in a URL or an incorrect slide selection is easy to miss until you actually click the link during a real run-through.
- Overusing hyperlinks on a single slide. Too many clickable elements can confuse an audience about what’s meant to be interactive versus just decorative text.
- Forgetting hyperlinked shapes don’t visually indicate they’re clickable by default. Without an added visual cue, viewers may not realize an image or shape is actually a link.
Best Practices
- Test every hyperlink in Slide Show mode before presenting, not just in the editing view, to confirm each one leads exactly where intended.
- Use action buttons for navigation-heavy presentations, since their built-in icons make clickable intent immediately obvious to viewers.
- Match hyperlink colors to your presentation’s theme, so links feel like an intentional design choice rather than a mismatched default.
- Prefer web-hosted links over local file links when the presentation might be shared, opened elsewhere, or presented from a different device.
- Add a ScreenTip for non-obvious links, giving viewers a preview of the destination before they click, especially useful in self-guided or interactive presentations.
Frequently Asked Questions
How do I hyperlink text in PowerPoint?
Select the text, go to Insert > Link > Insert Link, choose your destination (a website, a specific slide, a new document, or an email address), and click OK.
Can I hyperlink an image or shape in PowerPoint, not just text?
Yes. Select the image or shape (a single click, not a double-click), then follow the same Insert > Link > Insert Link process used for text.
How do I link to a specific slide in the same PowerPoint presentation?
In the Insert Link dialog, choose “Place in This Document” instead of a web address, then select the specific slide you want to link to from the list shown.
Why doesn’t my PowerPoint hyperlink work when I click it while editing?
Hyperlinks are typically only clickable during an actual presentation (Slide Show mode) or by right-clicking and selecting “Open Hyperlink” while in Normal view — a single click during normal editing won’t activate the link.
What are action buttons in PowerPoint, and how are they different from regular hyperlinks?
Action buttons are pre-designed shapes with built-in navigation icons (like Home, Back, or Forward) found under Insert > Shapes. They function as a specialized, visually clear type of hyperlink specifically designed for slide navigation.
Can I remove the underline from a hyperlink in PowerPoint?
Yes, formatting like the underline can be adjusted directly on the linked text using standard font formatting options, without removing the link itself.
Final Thoughts
Hyperlinking in PowerPoint follows the same basic process no matter what you’re linking — text, an image, or a shape all use the same Insert > Link menu, with options covering websites, specific slides, new files, and email addresses.
For more interactive, navigation-heavy presentations, action buttons offer a cleaner, more purpose-built alternative to manually hyperlinking individual shapes. Whichever method you use, always test every link in Slide Show mode before presenting — a broken or mistyped link is far easier to catch during a practice run than in front of a live audience.