If you want to know how to add Google Analytics to website pages so you can see exactly who visits your site, where they come from, and what they do once they arrive, you’re in the right place. Google Analytics is a free tool from Google that tracks visitor activity on your website and turns it into reports you can actually use.
This guide walks you through the entire process from scratch — even if you’ve never touched Google Analytics before. By the end, you’ll have a working Google Analytics account, a tracking code installed on your website, and confirmation that data is flowing in correctly.
We’ll cover three installation methods (manual code, WordPress plugin, and Google Tag Manager), explain every technical term in plain English, and show you how to avoid the mistakes that trip up most beginners.
Table of Contents
What Is Google Analytics, and Why Do You Need It?
Google Analytics is a free web analytics platform. It collects data about your website visitors — how many people visited, which pages they looked at, how long they stayed, and what device or browser they used.
Think of it like a security camera for your website, except instead of recording video, it records behavior: clicks, page views, purchases, form submissions, and more.
The current version is called Google Analytics 4, or GA4. Google retired the older version (Universal Analytics) in 2023, so GA4 is now the only option for new setups. Every instruction in this guide applies to GA4.
Why website owners use Google Analytics
- Understand your audience — see visitor location, age range, device type, and interests.
- Measure traffic sources — find out if visitors come from Google search, social media, ads, or direct links.
- Track conversions — know exactly which pages lead to sales, sign-ups, or downloads.
- Spot problems — identify pages with high bounce rates or slow load times that push visitors away.
- Make data-driven decisions — stop guessing what content works and start using real numbers.
Before You Start: What You’ll Need
Gather these three things before you begin:
- A Google account — a regular Gmail account works. Use a business email if you manage the site for a company, since this account will control your analytics data long-term.
- Admin access to your website — you’ll need to either edit your site’s code directly or install a plugin, so you need permission to make changes (WordPress admin login, website builder access, or a developer who can help).
- 15–30 minutes — the setup itself is quick, but it can take a few hours for the first data to fully appear in your reports.
Step 1: Create a Google Analytics Account and Property
Everything starts with creating a Google Analytics account, which then contains one or more “properties” (a property represents a single website or app).
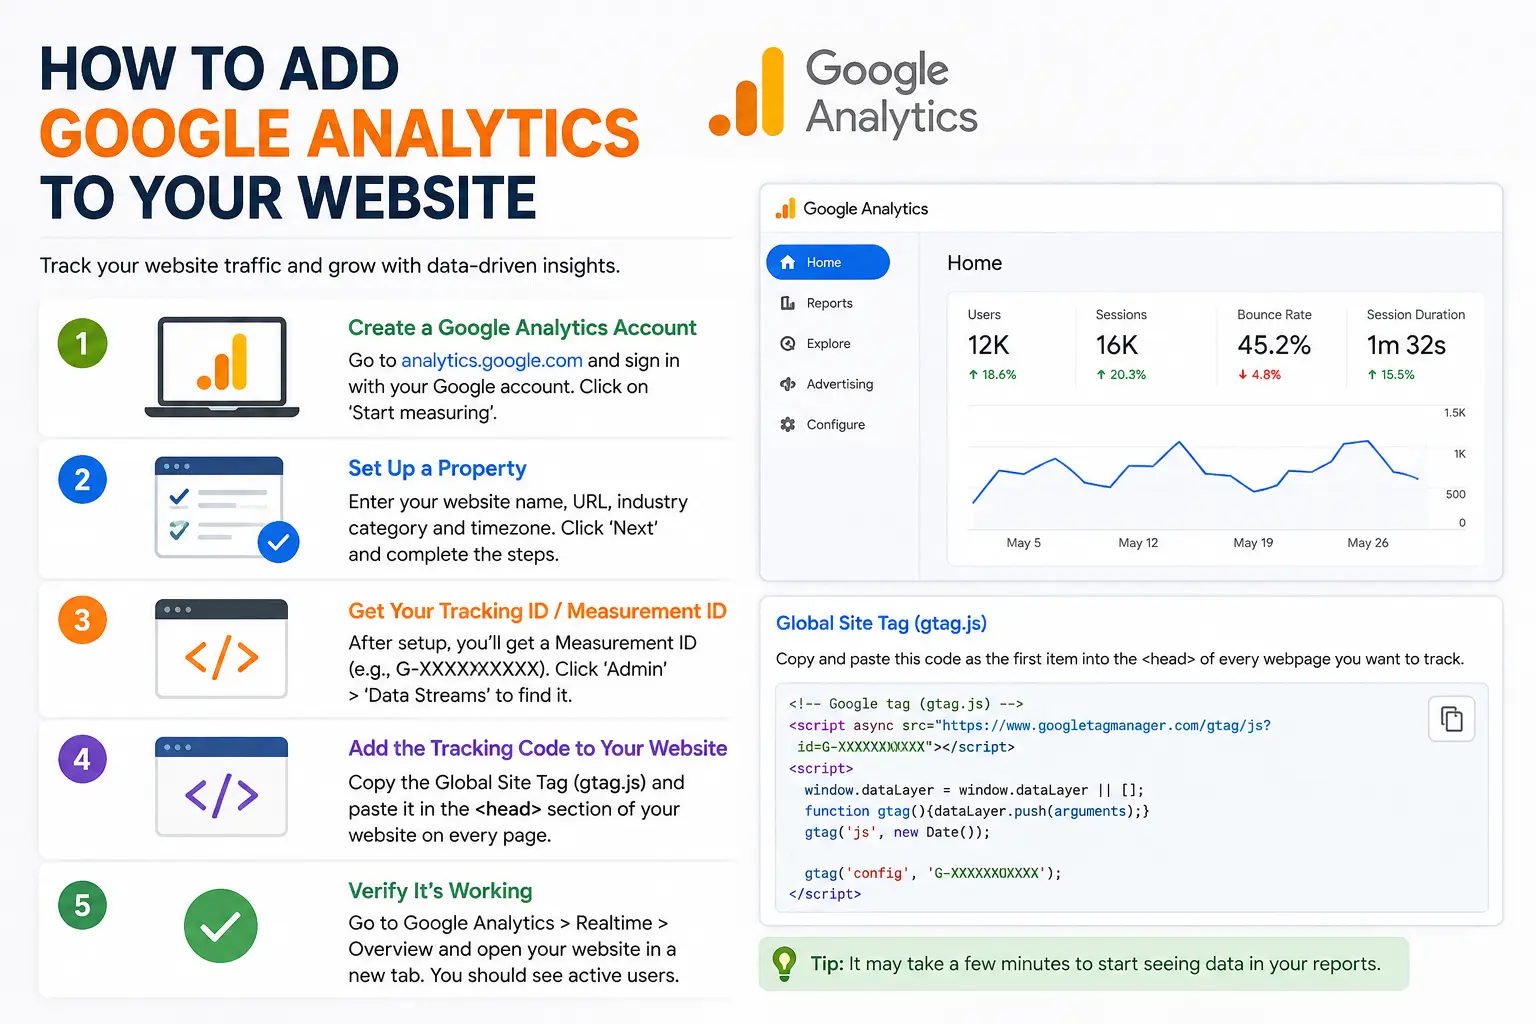
- Go to analytics.google.com and sign in with your Google account.
- If this is your first time, click Start measuring. If you already have an account, click the Admin gear icon in the bottom-left corner, then Create Account.
- Enter an Account name — this is usually your business or organization name. It’s just a label; visitors never see it.
- Review the data-sharing settings (these control whether Google can use your data for benchmarking and support purposes) and click Next.
- Enter a Property name — typically your website’s name.
- Choose your reporting time zone and currency. This affects how dates and revenue are displayed in your reports, so pick the values that match your business location.
- Click Next, fill in basic business details (industry category and business size), select how you plan to use Google Analytics, then click Create.
- Accept the Google Analytics Terms of Service when prompted.
You now have a GA4 property. Next, you need to connect it to your actual website.
Step 2: Set Up a Data Stream and Get Your Measurement ID
A data stream is the specific connection between your website and your GA4 property. This is where Google Analytics collects the raw data before turning it into reports.
- After creating your property, you’ll land on the Data Streams screen (or go to Admin > Data Streams).
- Choose Web as your platform.
- Enter your website’s URL and give the stream a name (like “Main Website”).
- Leave Enhanced measurement turned on. This automatically tracks common actions like page views, scrolls, outbound clicks, and file downloads without any extra setup.
- Click Create stream.
Once the stream is created, you’ll see your Measurement ID — a code that starts with G- followed by letters and numbers (for example, G-XXXXXXX). This ID is how your website tells Google Analytics “this data belongs to me.”
Important: Creating a data stream does not start tracking automatically. You still need to install the tracking code on your website — that’s Step 3.
Step 3: Add the Google Analytics Code to Your Website
This is the core step in how to add Google Analytics to your website. There are three common methods. Pick the one that matches your setup.
Comparison of installation methods
| Method | Best For | Coding Required | Setup Time |
| Manual code (Global Site Tag) | Custom-built or HTML sites | Basic | 5–10 minutes |
| CMS plugin (e.g., WordPress) | WordPress, Wix, Squarespace users | None | 5 minutes |
| Google Tag Manager (GTM) | Sites needing multiple tracking tools or advanced event tracking | Basic to moderate | 15–20 minutes |
Method 1: Add the Google Analytics code manually
Use this method if you built your website with plain HTML or have direct access to your site’s template files.
- In GA4, go to Admin > Data Streams, select your web stream, and click View tag instructions.
- Select Install manually.
- Copy the snippet of code shown. It looks similar to this:
<!– Google tag (gtag.js) –>
<script async src=”https://www.googletagmanager.com/gtag/js?id=G-XXXXXXX”></script>
<script>
window.dataLayer = window.dataLayer || [];
function gtag(){dataLayer.push(arguments);}
gtag(‘js’, new Date());
gtag(‘config’, ‘G-XXXXXXX’);
</script>
- Paste this code into the <head> section of every page you want to track. If your site uses a shared header or template file, add it there once so it applies site-wide.
- Save and publish the changes.
Method 2: Use a plugin (recommended for WordPress, Wix, and similar platforms)
If your site runs on WordPress, a plugin is the simplest route because it avoids editing code directly.
- In your WordPress dashboard, go to Plugins > Add New.
- Search for a Google Analytics plugin such as Site Kit by Google (Google’s own official plugin) or a third-party option like MonsterInsights.
- Install and activate the plugin.
- Follow the plugin’s setup wizard, sign in with the same Google account used for GA4, and select your website’s property.
- Most plugins detect and connect your Measurement ID automatically. If asked, paste in the G-XXXXXXX ID from Step 2.
- Save your settings.
Website builders like Wix and Squarespace have a similar process: look for a “Marketing & SEO” or “Integrations” section in your site settings, then paste in your Measurement ID.
Method 3: Install through Google Tag Manager (GTM)
GTM is a free tool that manages multiple tracking codes without editing your site’s code every time you make a change. It’s worth using if you plan to track specific button clicks, form submissions, or run other marketing tools alongside Google Analytics.
- Go to tagmanager.google.com and create an account and a container for your website.
- GTM will give you two code snippets. Add the first one to the <head> section of your site and the second one right after the opening <body> tag.
- Inside GTM, click Tags > New.
- For Tag Configuration, choose Google Analytics: GA4 Configuration.
- Paste your Measurement ID (G-XXXXXXX) into the Tag ID field.
- Under Triggering, select Initialization – All Pages so the tag fires on every page load.
- Name the tag (for example, “GA4 Configuration”) and click Save.
- Click Preview in the top-right corner to test the tag before it goes live.
- Once you confirm it’s working, click Submit, then Publish to push the change to your live website.
Step 4: Verify That Google Analytics Is Tracking Your Website
Never assume the setup worked — always confirm it. Skipping this step is one of the most common mistakes, and it means you could go weeks without collecting any real data.
Use the Realtime report
- Open your website in a new browser tab and browse a few pages.
- In Google Analytics, go to Reports > Realtime.
- You should see your visit appear within a minute or two, showing your approximate location and the pages you viewed.
Use DebugView for a closer look
- In GA4, go to Admin > DebugView.
- If you installed via GTM, turn on Preview mode first.
- Browse your site and watch individual events (like page_view or scroll) appear in real time.
If nothing shows up after a few minutes, double-check that the Measurement ID in your code matches the one in your GA4 property, and confirm the code is actually published live (not just saved as a draft).
How to Add a Website to Google Analytics (If You Already Have an Account)
If you already use Google Analytics for one site and want to add another one, you don’t need a new account.
- Go to Admin in your existing Google Analytics account.
- Click Create Property and repeat the same steps from Step 1 above (name, time zone, currency).
- Set up a new data stream for the new website’s URL, following Step 2.
- Install the resulting Measurement ID on the new site using whichever method fits it best (manual, plugin, or GTM).
Each website gets its own property and Measurement ID, even if they’re managed under the same Google Analytics account.
Common Mistakes to Avoid
- Installing the wrong ID. Every property has a unique Measurement ID. If you manage multiple sites, double-check you’re pasting the correct one into each site.
- Placing the code in the wrong location. The tracking snippet must go in the <head> section (or immediately after the opening <body> tag for GTM) on every page — not buried in a footer or a page that isn’t loaded first.
- Forgetting to publish changes. Many website builders and plugins require you to click “Publish” or “Save & Deploy” separately from just entering the code.
- Expecting instant historical data. Google Analytics only tracks activity from the moment it’s installed onward. It cannot show you past traffic.
- Ignoring cookie consent requirements. If your audience includes visitors from the EU, UK, or other regions with privacy laws, you likely need a cookie consent banner before analytics scripts fully activate.
- Not setting up key events. Enhanced measurement covers basics like page views, but conversions like form submissions or purchases often need to be manually marked as “key events” (formerly called goals) in GA4 settings.
Best Practices After Setup
- Link Google Search Console to Google Analytics (under Admin > Product Links) to see which search queries bring visitors to your site.
- Set up key events for actions that matter to your business, such as newsletter sign-ups or completed purchases.
- Filter out internal traffic so your own visits (and your team’s) don’t inflate your reports. This is done under Admin > Data Settings > Data Filters.
- Review reports weekly, not just once after setup. Trends matter more than single-day numbers.
- Set data retention to the longest available option under Admin > Data Settings > Data Retention so you can compare year-over-year performance later.
Frequently Asked Questions
How do I get Google Analytics for my website for free?
Google Analytics is completely free for standard use. Just create an account at analytics.google.com, set up a property, and install the tracking code as described above. There’s a paid enterprise version called Google Analytics 360, but it’s unnecessary for most websites.
How long does it take for Google Analytics to start showing data?
Realtime data appears within a minute of installation. However, full standard reports can take 24–48 hours to populate completely as Google processes the data.
Can I add Google Analytics without coding knowledge?
Yes. If your site runs on WordPress, Wix, Squarespace, or Shopify, you can use a plugin or built-in integration to add your Measurement ID without touching any code.
What’s the difference between Google Analytics and Google Search Console?
Google Analytics shows what visitors do after they land on your site (pages viewed, time spent, conversions). Google Search Console shows how your site performs in Google search results (rankings, clicks, impressions). They work best together — link them for the full picture.
Do I need Google Tag Manager to use Google Analytics?
No, Google Tag Manager is optional. It’s useful if you want to manage multiple tracking tools or track specific interactions (like button clicks) without repeatedly editing your site’s code. For basic tracking, the manual code or a plugin is enough.
Is Universal Analytics still available?
No. Universal Analytics stopped processing new data in mid-2023. Google Analytics 4 is the only active version, and all new installations use GA4.
Final Thoughts How to Add Google Analytics to Website
Setting up Google Analytics on your website comes down to four steps: create your account, generate a data stream to get your Measurement ID, install that ID using the method that fits your site, and confirm it’s working with the Realtime report.
Once tracking is live, resist the urge to check it once and forget about it. The real value of Google Analytics shows up over weeks and months, as you start noticing which pages perform best and where visitors drop off — insights you can use to make your website genuinely better for the people who visit it.