So you just registered your domain, and now you’re staring at the confirmation email thinking: I have a domain name now what ? It’s one of the most common moments of confusion in building an online presence — you’ve done the easy part, and the actual website isn’t built yet.
The good news is that a domain name is just the address; everything else is a series of straightforward steps. This guide walks through exactly what to do next, in order: setting up hosting, connecting your domain, choosing how to build your site, setting up email, and launching properly.
Table of Contents
First, Understand What You Actually Own Right Now
Buying a domain only reserves your website’s address — it doesn’t include a website, hosting, or email automatically. Think of it like reserving a street address before the house is built. You now have exclusive rights to that name, but the “building” (your actual website) still needs to go up.
Here’s what a domain does and doesn’t include:
| Included With Domain Registration | Not Included |
| Exclusive rights to the name | Website hosting/server space |
| DNS management access | A built website |
| WHOIS/ownership record | Email inbox (usually needs separate setup) |
| Ability to point it anywhere | SSL certificate (sometimes bundled, sometimes not) |
If any of this terminology is unfamiliar, our explainer on what is a URL breaks down how a domain fits into a full web address, and what is a domain name system explains how your domain actually connects to a server once everything’s set up.
Step 1: Decide How You Want to Build Your Website
This decision shapes every step that follows, so it comes first.
- Website builder (Wix, Squarespace, Shopify) — easiest option, drag-and-drop, hosting is usually included.
- WordPress — most flexible and widely used, requires separate hosting, larger learning curve.
- Custom-coded site — full control, best for developers or agencies building something specific.
- E-commerce platform (Shopify, WooCommerce) — purpose-built for selling products online.
For most beginners without technical experience, a website builder with built-in hosting is the fastest path from domain to live site. For more control, flexibility, and long-term scalability, WordPress is the industry standard.
Step 2: Choose (or Confirm) Your Hosting
If you picked a website builder, hosting is usually bundled in — you can often skip this step. If you’re going the WordPress or custom-code route, you’ll need separate hosting.
What hosting actually does: it’s the physical server space where your website’s files live. Your domain is just the address that points visitors to that server.
Basic hosting types:
- Shared hosting — affordable, good for small sites and blogs just starting out.
- Managed WordPress hosting — optimized specifically for WordPress performance and security.
- VPS/Cloud hosting — more power and control, better for growing or high-traffic sites.
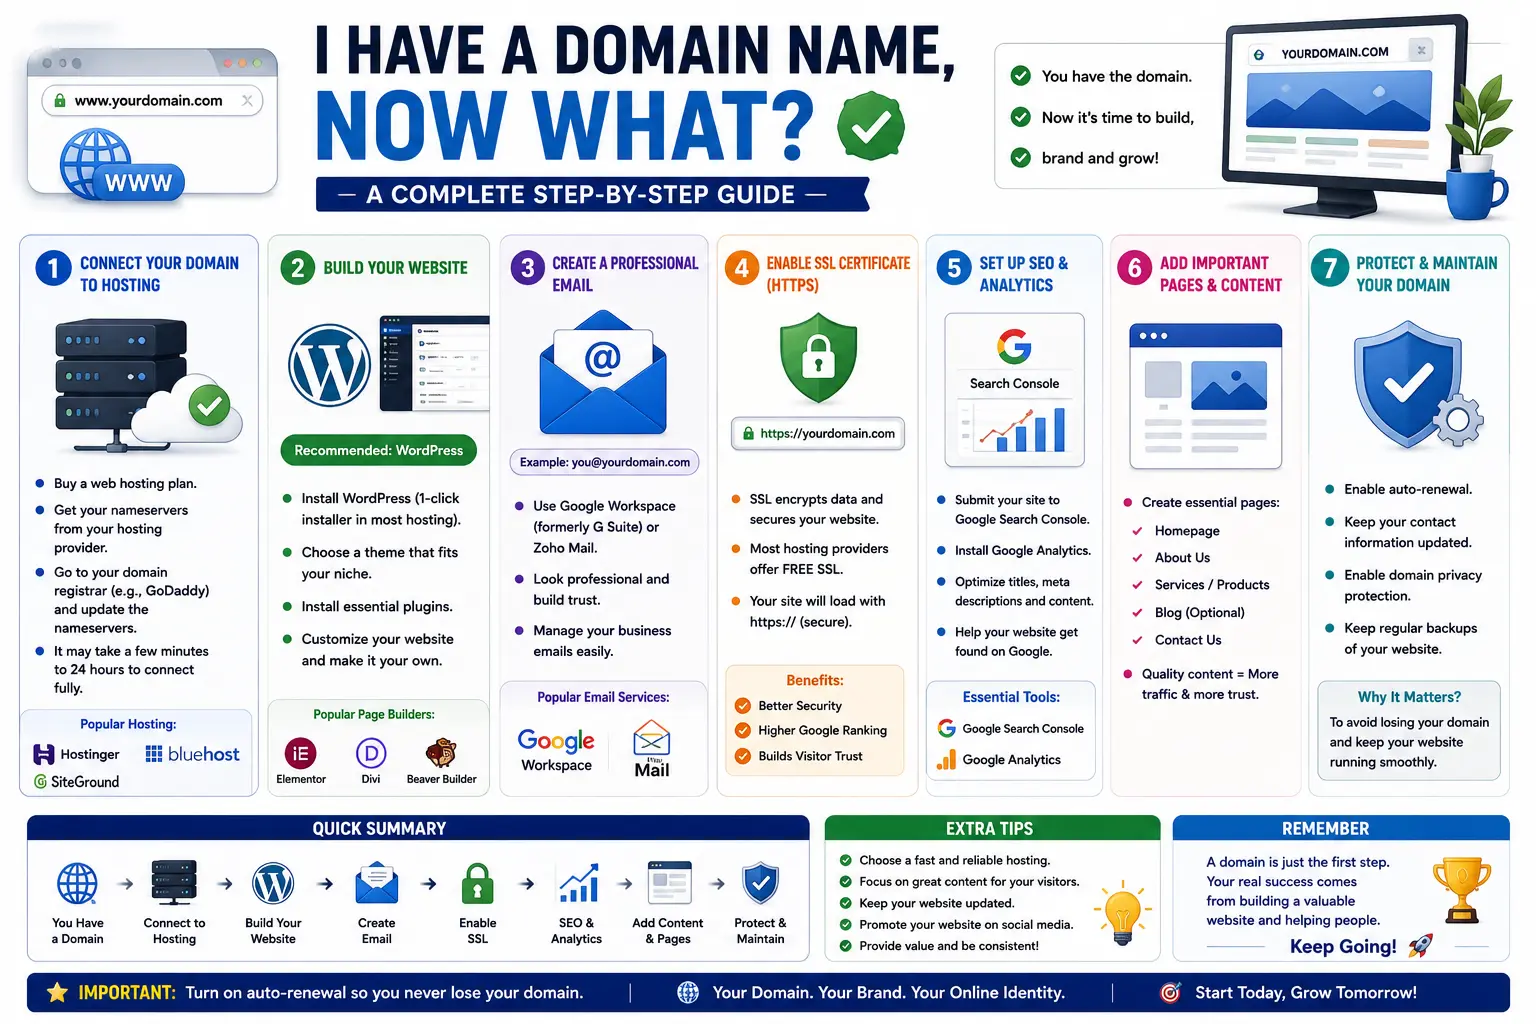
Step 3: Connect Your Domain to Your Website or Hosting
This is the step that actually makes your domain “work” — without it, your domain sits idle even though you own it.
- Log into your domain registrar (where you bought the domain).
- Find DNS Management or Nameservers.
- If using a website builder, enter the nameservers provided by that platform (they’ll give you exact values to paste in).
- If using separate hosting, update the A record to point to your host’s IP address, or update nameservers to your host’s values.
- Save changes and allow time for propagation — usually a few hours, occasionally up to 48 hours.
If you registered your domain with one company and are hosting elsewhere, that’s completely normal and doesn’t require a transfer — just a DNS update, which is far simpler than a full domain transfer.
Step 4: Install an SSL Certificate
SSL encrypts the connection between your visitors and your website, which shows as the padlock icon in the browser and is required by nearly all hosts and browsers today.
- Most modern hosting providers and website builders include free SSL automatically.
- If yours doesn’t, look for a free option like Let’s Encrypt through your hosting dashboard.
- Without SSL, browsers display a “Not Secure” warning, which damages trust and can hurt search rankings.
Step 5: Set Up Professional Email
A domain-based email address (like you@yourbusiness.com) looks significantly more credible than a generic free email account, especially for business use.
Common options:
- Google Workspace or Microsoft 365 — paid, reliable, full inbox features.
- Hosting-included email — many hosting plans include a basic email inbox for free.
- Email forwarding — free, forwards messages sent to your domain email into an existing inbox, without a separate mailbox.
Our guide on email address domain names covers exactly how domain-based email works and how to set it up correctly.
Step 6: Build Your Website’s Core Pages
Before launching, most sites need at least these basics:
- Homepage — clear statement of who you are and what you offer.
- About page — background and credibility.
- Contact page — a working form or listed contact method.
- Services/Products page — what you’re actually offering.
- Privacy policy — often legally required, especially if collecting any visitor data.
Keep the initial launch simple. It’s far more effective to publish a clean, functional five-page site than to delay launch chasing a “perfect” twenty-page version.
Step 7: Set Up Basic SEO Foundations
Getting found on Google starts the moment your site goes live, so it’s worth handling early rather than as an afterthought.
- Submit your site to Google Search Console and verify ownership.
- Create and submit an XML sitemap so search engines can find your pages.
- Write clear, descriptive page titles and meta descriptions for each page.
- Use clean, readable URL slugs — our guide on URL slugs explains what makes a slug SEO-friendly versus messy and hard to read.
- If you’re targeting specific keywords, review our guide on URL keywords and SEO for how URL structure affects visibility.
Step 8: Connect Social Media and Business Listings
Once your site is live, tie it together with your other online presence:
- Add your website link to Instagram, Facebook, and LinkedIn bios.
- Set up a Google Business Profile if you have a physical location or serve a local area.
- Make sure your domain matches your branding consistently across every platform.
Common Mistakes People Make After Buying a Domain
- Letting the domain sit unused for months, losing early momentum and search engine trust that builds gradually over time.
- Skipping SSL setup, which triggers browser security warnings and erodes visitor trust immediately.
- Overcomplicating the first version of the site, delaying launch by chasing unnecessary features.
- Forgetting to set up domain-based email, missing out on a simple credibility boost.
- Not enabling auto-renewal, risking accidental domain expiration down the line.
- Choosing hosting that doesn’t match the platform — for example, buying generic hosting when your site actually needs WordPress-optimized hosting.
A Realistic Timeline From Domain to Launch
| Stage | Typical Time |
| Choosing a website builder or hosting | 1 day |
| Connecting domain via DNS | A few hours to 48 hours (propagation) |
| Setting up SSL | Usually automatic, same day |
| Building core pages | 3–10 days depending on complexity |
| SEO basics + Search Console setup | 1 day |
| Total: domain to live launch | About 1–2 weeks for a simple site |
Best Practices for a Smooth Launch
- Start with a simple, functional site rather than waiting for perfection.
- Test your site on both desktop and mobile before considering it “launched.”
- Double-check that every internal link and button actually works before sharing the site publicly.
- Keep your domain renewal on auto-pay so it never lapses unexpectedly.
- Revisit your domain name registrar settings periodically to confirm contact info and DNS records are current.
Frequently Asked Questions
I bought a domain name — do I automatically get a website? No. A domain is only the address; you still need to choose a website builder or hosting provider and actually build the site before it’s live.
How long does it take to build a website after buying a domain? A simple site can go live within a week or two using a website builder. More complex custom sites can take several weeks to months, depending on design and functionality needs.
Do I need hosting if I already bought a domain? Yes, unless your website builder includes hosting automatically. A domain and hosting are two separate services that need to be connected.
Can I use my domain name for email too? Yes. You can set up a domain-based email address like you@yourdomain.com through your hosting provider, Google Workspace, Microsoft 365, or a free forwarding service.
What’s the cheapest way to turn a domain into a working website? A budget-friendly website builder with hosting included, combined with free SSL and free email forwarding, is typically the lowest-cost path from domain purchase to a live site.
Do I need to know how to code to build a website after buying a domain? No. Website builders like Wix and Squarespace, along with WordPress’s visual page builders, let you create a full site without writing any code.
Final Thoughts I Have a Domain Name Now What
Owning a domain name is the starting line, not the finish line. The path from “I have a domain name” to a live, working website follows a clear sequence: pick your platform, connect DNS, secure it with SSL, set up email, build your core pages, and lay basic SEO groundwork. Follow these steps in order, and a domain that felt like an open question a moment ago turns into a fully functioning website within a week or two.