Learning how to create subdomain cPanel is one of the fastest ways to add a new section to your website — a blog, a staging environment, a client portal, or a mobile version of your site — without registering an entirely new domain. The process takes less than a minute once you know where to look, though the exact menu names can vary slightly depending on your hosting provider.
This guide covers the full process in cPanel, plus how to create a subdomain directly through Namecheap’s DNS if your domain isn’t using cPanel hosting at all.
Table of Contents
What Is a Subdomain, and Why Create One?
A subdomain is a prefix added in front of your root domain, such as blog.example.com or shop.example.com. It functions as its own section of your site — with its own folder, and sometimes its own software entirely — while still living under your main brand. Our guide on what is a subdomain covers the concept in more depth if you’re still getting familiar with it.
Common reasons to create one include:
- A blog (blog.example.com)
- A staging or testing environment (staging.example.com)
- A support or documentation portal (help.example.com)
- A separate app or store (app.example.com, shop.example.com)
Before You Start
Make sure of two things first:
- Your root domain is already connected to the hosting account where you’re creating the subdomain — either as the primary domain, an addon domain, or an alias, depending on your setup.
- You have cPanel login access with permission to manage domains. Most hosts send this in a welcome email or make it available directly from your hosting dashboard.
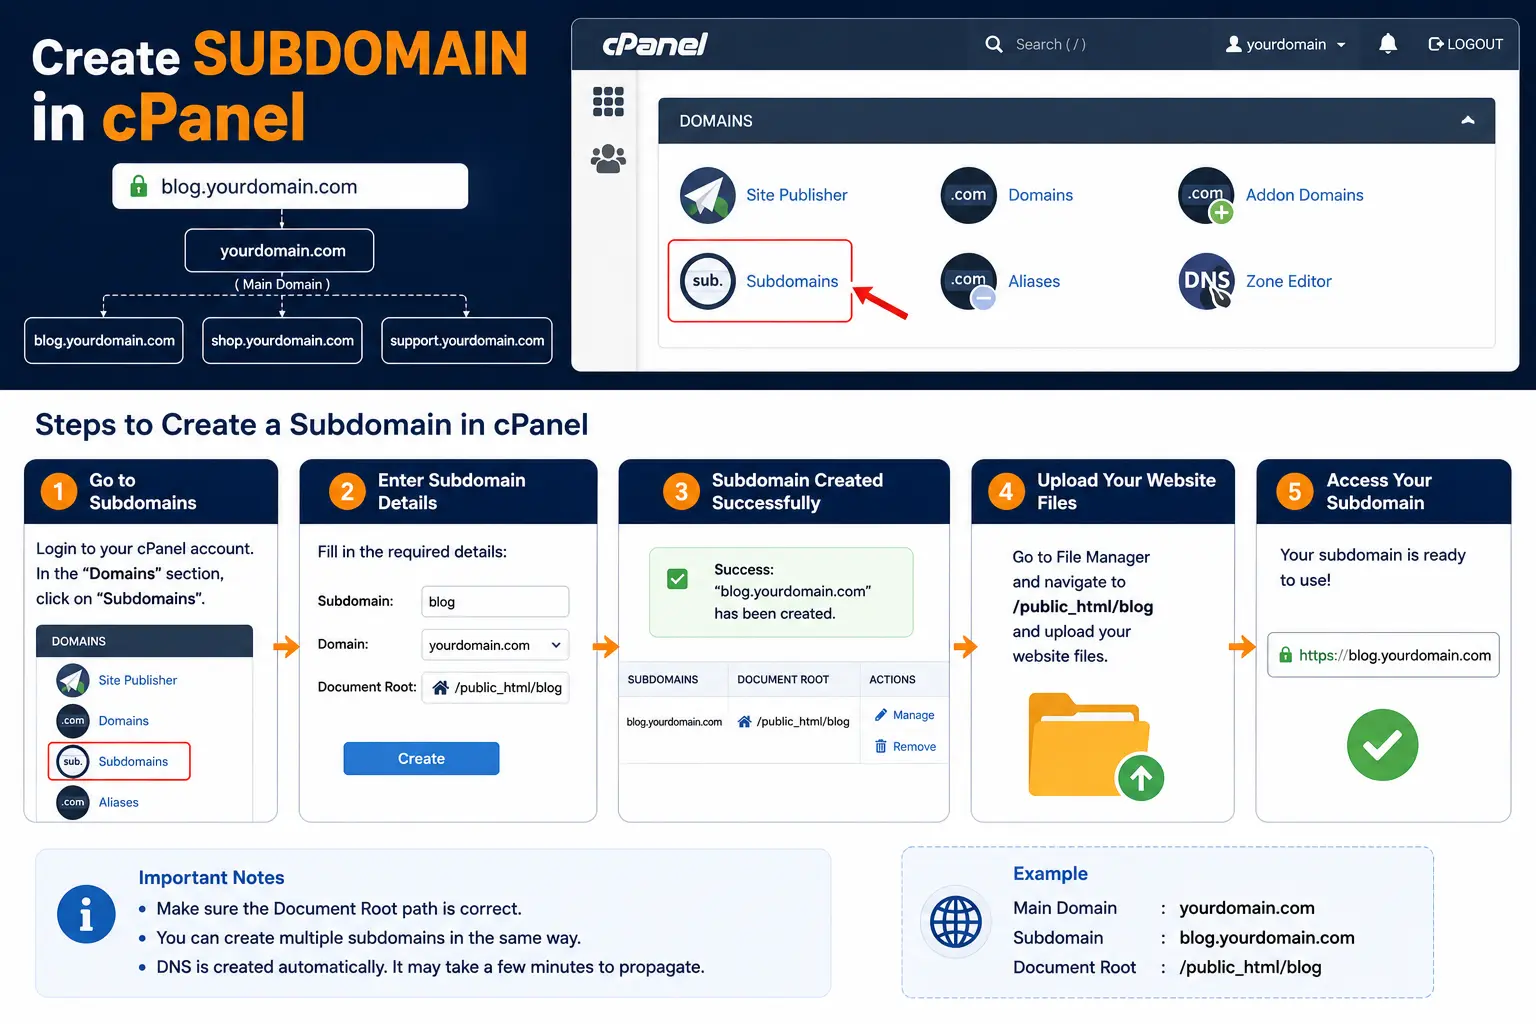
How to Create a Subdomain in cPanel
cPanel’s interface has consolidated over recent updates, so depending on your hosting provider you may see either a dedicated Subdomains icon or a unified Domains tool that handles subdomains as part of adding any new domain. Both accomplish the same result — here’s the process for each.
Method 1: Using the Domains Tool (Most Common on Newer cPanel Versions)
Step 1: Log in to cPanel Go to your hosting provider’s cPanel login and sign in.
Step 2: Open the Domains tool Under the Domains section, click Domains, then click Create A New Domain.
Step 3: Enter the subdomain name In the Domain field, type the full subdomain you want to create — for example, blog.example.com — not just the prefix.
Step 4: Set the document root This is the folder on your server where the subdomain’s files will live.
- To make the subdomain show the exact same content as your main site, leave Share document root checked.
- To give it its own separate content, uncheck this option and either accept the auto-generated folder path or choose your own.
Step 5: Click Submit cPanel creates the subdomain and, in most cases, the matching folder on your server automatically.
Method 2: Using the Subdomains Tool (Older/Classic cPanel Layout)
Step 1: Log in to cPanel Navigate to Home → Domains → Subdomains.
Step 2: Enter the subdomain details Type your desired subdomain name and select the correct root domain from the dropdown.
Step 3: Set the document root cPanel will suggest a folder path automatically; you can edit it if you’d prefer a custom location.
Step 4: Click Create Your subdomain is created and ready to use within a few minutes.
How Long Until the Subdomain Works?
If your domain already points to your hosting provider’s nameservers, the subdomain is usually live within a few minutes. If your DNS is managed elsewhere, full propagation can take anywhere from a few minutes up to around 30–40 minutes worldwide.
How to Create a Subdomain in Namecheap
There are two different situations here, and they matter:
If Your Domain Uses Namecheap Web Hosting (cPanel)
If your domain is pointed to Namecheap’s own hosting, subdomains are created in cPanel exactly as described above — Namecheap’s hosting platform runs on standard cPanel, so the same Domains → Create A New Domain steps apply.
If Your Domain Uses Namecheap’s DNS Only (No cPanel Hosting)
If your domain is registered with Namecheap but hosted elsewhere (a common setup when using a different host, a page builder, or a third-party platform), you create the subdomain directly through Namecheap’s DNS settings instead.
Step 1: Log in to Namecheap Go to Domain List and click Manage next to the domain you want to add a subdomain to.
Step 2: Open Advanced DNS Click the Advanced DNS tab.
Step 3: Add a new record In the Host Records section, click Add New Record.
Step 4: Choose the record type
- Select A Record if you’re pointing the subdomain to a specific IP address.
- Select CNAME Record if you’re pointing it to another hostname instead.
Step 5: Enter the subdomain name only In the Host field, enter only the subdomain prefix — for example, blog — not the full blog.example.com. Namecheap automatically appends the root domain.
Step 6: Enter the value Add the destination IP address (for an A record) or hostname (for a CNAME record).
Step 7: Save Click Save All Changes. The new subdomain record typically takes effect within about 30 minutes.
cPanel vs. Namecheap DNS: Which One Should You Use?
| Situation | Where to Create the Subdomain |
| Domain and hosting are both with the same cPanel provider | cPanel’s Domains/Subdomains tool |
| Domain is registered at Namecheap, hosted elsewhere | Namecheap’s Advanced DNS (A or CNAME record) |
| Domain uses Cloudflare for DNS | Cloudflare’s DNS Records panel — see our Cloudflare subdomain guide |
Common Mistakes When Creating a Subdomain
- Entering the full hostname instead of just the prefix. In Namecheap’s Host field, typing blog.example.com instead of just blog creates a broken, duplicated record.
- Creating the subdomain in the wrong place. If your domain’s DNS is managed outside of cPanel (e.g., through Namecheap or Cloudflare), creating it inside cPanel alone won’t make it resolve — the DNS layer has to match where your domain actually points.
- Forgetting to set a separate document root. If you want unique content for the subdomain but leave “Share document root” checked, it will just mirror your main site.
- Expecting instant propagation. A subdomain can take anywhere from a few minutes to around 30–40 minutes to fully resolve worldwide, depending on your DNS provider.
- Skipping SSL setup. A newly created subdomain doesn’t automatically have HTTPS coverage in every configuration — see our SSL subdomain guide to make sure it’s properly secured.
Best Practices
- Use a clear, descriptive subdomain name that matches its purpose (blog, shop, app, staging) rather than something ambiguous.
- Keep a simple record of every subdomain you create and what it’s for — unused or forgotten subdomains can become a minor security liability over time.
- If the subdomain will carry meaningful content and SEO value, review subdomain SEO to understand how it may be treated differently from a subdirectory.
- Double-check whether your domain’s DNS is actually managed by your hosting provider, your registrar, or a third party like Cloudflare before creating any record — this determines exactly where the subdomain needs to be set up.
Frequently Asked Questions
How do I create subdomain cPanel? Log in to cPanel, go to Domains, click Create A New Domain, enter the full subdomain name (e.g., blog.example.com), choose or customize the document root, and click Submit.
How do I create a subdomain in Namecheap? If your domain uses Namecheap hosting, create it through cPanel the same way as any hosting account. If your domain only uses Namecheap for DNS, go to Advanced DNS → Add New Record, choose A or CNAME, and enter just the subdomain prefix in the Host field.
Do I need to add a DNS record manually after creating a subdomain in cPanel? Usually not, if your domain is already pointed to your hosting provider’s nameservers — cPanel handles the DNS automatically in that case. If your DNS is managed elsewhere, you’ll need to add the matching record there instead.
How long does it take for a new subdomain to work? Typically a few minutes if your DNS is already pointed to the right provider, though full worldwide propagation can occasionally take up to around 30–40 minutes.
Can I create a subdomain without cPanel? Yes. Any DNS provider — including Namecheap’s Advanced DNS, Cloudflare, or your registrar’s own DNS panel — can create a subdomain by adding an A or CNAME record, regardless of whether you use cPanel for hosting.
What’s the difference between the Subdomains tool and the Domains tool in cPanel? They accomplish the same result. Older cPanel layouts use a dedicated Subdomains tool, while newer versions have folded that functionality into the general Domains tool, where subdomains are created the same way as any new domain.
Final Thoughts Create Subdomain cpanel
Creating a subdomain in cPanel is a quick, low-risk task once you know which tool your hosting provider uses and where your domain’s DNS actually lives. If your setup involves Namecheap purely for domain registration, remember the subdomain needs to be created wherever your DNS is actually managed — not necessarily inside cPanel.
Once your subdomain is live, it’s worth reviewing how a fully qualified domain name is structured and comparing subdomain vs subdirectory approaches, especially if you’re deciding how to organize future sections of your site.